A New Kid: Young Image Sewing Magazine

Not exactly new, but relatively new: Young Image pattern magazine focuses on girls, sizes 80-164 cm. I had been tempted to buy an issue for a while, but there’s not much in the way of  peer reviews online about the patterns. I have a tween and these designs looked pretty stylish. She is very particular and style is everything–if you have a tween, then I’m sure you get this. So when the opportunity presented itself, I purchased a single issue.

Avery Lane Blog Young Image pattern y1111 Summer 2011 issue

My daughter wanted a dress-first time in over a year <jaw drop>, so she sat down with all my pattern magazines. She picked one: (y1111) from the Young Image Summer 2011 issue that I had bought a little while back. She made a few changes, as she usually does, and I set to work. As I traced her size, I started to become concerned with sizing. This is an empire waist dress with a 10 gore skirt attached (think Feliz or Elodie on the skirt), so I was most concerned about the bodice and traced the size according to her chest measurements. It has a side zipper, so it is not designed to be an easy fitting or loose dress. That said, the photos in the magazine of the design did not show a tight fitting dress either.

The magazine has nice designs. The patterns are printed on pretty thin paper though. The instructions were mostly clear, but not all that descriptive and some of it seemed to be lost in translation. Evidently the English word “pass” means “yoke”  and to make a strap, one must stitch the strap “double.”  Here’s another that had me scratching my head: “reef the bow through the tunnel and stitch it at the zipper,” which I take to mean: insert or feed the drawstring into the casing, work it through until it comes out the other end of the opening in the casing. Stitch drawstring in place at the zipper. It seems they could have done better translations for clarity and to be helpful to the beginner sewist. The design was pretty straight forward, so I didn’t really need/use the instructions. But if I was new to sewing, I may have been very frustrated.

The pattern pieces weren’t as clear as they could have been either; the only markings were in a foreign language–or just letters like “RVD/FL” and “MV/VM”. Evidently, “MVSTOV/VMSTOFBR” means fold line. Thankfully, I found some help here in this sewing glossary for European pattern sewing. (cause Babylon and Google translate were absolutely no help)

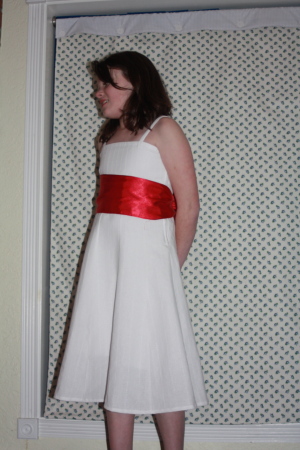
The fit was tight, tight, tight, and so the first fitting was interesting. The bodice (or pass as they were calling it) fit perfectly. What I had not thought about or planned for was the hips. The photo in the magazine does NOT show a fitted style skirt, but that skirt was fitting like a glove. The weird thing—it fit everywhere until an inch or so below her natural waistline.  I fixed the fitting problem with a gusset, which matched well with the 10 gore skirt style anyway.

I think this would not be a problem on a younger child or a really straight up and down, skinny kid. If I sew this again (a big if), I would shorten the gore pieces along the top, so that it would still fit the bodice, but begin its flare sooner. This would make the skirt wider when it reaches the hips. The way it’s drafted, the flaring begins at or below the hips, which the photos in the magazine don’t really illustrate.

Avery Lane Blog Young Image pattern y1111 Summer 2011 issue

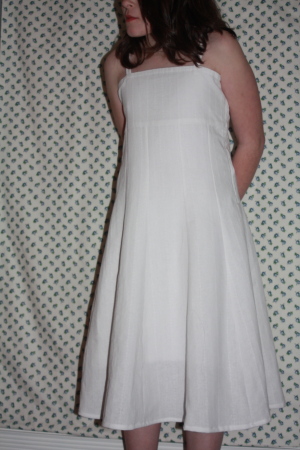
The back view:

Avery Lane Blog Young Image pattern y1111 Summer 2011 issue

My daughter loves the dress, which I suppose is the only thing that matters, at least to me. Here she is with her satin sash, which was part of her master design 🙂 I think the dress looks stylish and classy on her.

Avery Lane Blog Young Image pattern y1111 Summer 2011 issue

As far as my review for the magazine and its pattern, I’m not sure I will be purchasing another– At least not today. I have only sewn the one design and will attempt at least one more before giving up. I do think the translation to English could be improved a lot. The pattern pages could be printed on more substantial paper and they should include English markings for clarity. There were no pattern pieces for the straps–not a huge deal for me, but maybe  for a beginner.  Nor were the size/measurements given to cut  out the strap pieces.

The magazine states on its cover: “instructions are understandable” and “suitable for beginners,” but some of the wording is odd. Some basic info is omitted in the instructions for the pattern I sewed up, information such as right sides together or wrong sides facing together. For a beginner, this is not going to be obvious. This pattern in particular has an overlay, which would need to be placed its wrong side facing the right side of main skirt piece. Omitting this info is not good to do, imo, especially if one is claiming that the pattern is “suitable for beginners.” I personally would not recommend this magazine to any beginner.  <<But>> the designs are so trendy and ideal for tweens, so I will be giving it another try and post about it.

Have you sewn up an Young  Image pattern? If so, please do share your experience and insight. It helps to have online reviews before sewing a new pattern. It’s usually where I begin and I wish there were some out there for this magazine.

~Erin

Update:

Changes I made: lengthened to below the knee and did not make the overlay. I made the bodice plain–without the drawstring and slit opening.

 

Onion Goggles? Really?

While browsing a local cooking supply type store, I saw these– Ridiculous-looking goggles for the cook (or prep cook, whichever it may be) to wear while cutting onions. Now I have thought safety goggles, even for cooking, are a good thing (especially in my kitchen), but for the sole purpose of cutting onions? Save your $20! There’s a free alternative…. and surely I am not the only person that knows to do this.

Place your onions in the refrigerator. Chill it completely. That’s it. Try it sometime. I have done this for years, and I never cry while cutting onions.

<<Would be nice to have a picture of an onion right here, wouldn’t it?>>

My mom tried to convince me that cutting onions next to a lighted candles stops you from tearing up, but I disagreed. Tested her theory, and we both discovered refrigerated onions works better to stop all the tears. Though she’s a bit stubborn  strong-willed, and continues to light her candles–She says she doesn’t mind a little cry now and again, especially  in a candle-lit room. Okay–whateves.

All one need to do is keep onions in the fridge instead of the pantry. Simple and free solution. Now, you won’t look as geeky cool as you would wearing head gear while cooking, but you could still do both 😉 Or better yet, just grab the pool bag and steal your kid’s goggles. I bet someone has already figured that one out, too. I should do a google goggle onion search.

I’m sure there are a ton of tips and tricks that I don’t know about–feel free to share them in the comments. I need all the help I can get 🙂

~Erin

Adventures in Bread Making

I love bread with dinner. Warm bakery bread. Artisan bread. Sourdough bread. Yum.  I love warm bread with soup and pasta, but I hate going to the store just for artisan or sourdough bread. I really wish I was savvy enough to make my own, but it seems so daunting and time-consuming. And then the thought of it tasting like crap err not good, after all that work. I ran across this book at our local library, Artisan Bread in Five Minutes a Day. Really?!?  Could it be so? I have a love affair with bread that borders on obsession, so I checked it out and brought it home.

I am such the procrastinator that it sat. Well, actually it sat in many linear spaces, but was never opened. Not even during its short transits.  I thought about opening and actually reading it as I moved it out of my way, but thought–later. I’ll have time later. So much faith in that thought that I renewed the dusty book.

Well,  its moment finally came. I opened it and read some of its content. The book was so convincing that I was determined to attempt bread making. After all, I made my fist pie crusts in November, which was ridiculously easy. Not time-consuming as I had believed and was very tasty (or maybe my family just loves me so much they will say anything to make me feel good).

Well, after reading just the first few, very short chapters, I realized I don’t have a lot of the needed tools. The day I opened the book in determination to conquer the bread making feat turned out to be an epic fail in the my struggle against procrastination.

That was short-lived. Instead of going out and buying recommended tools, I made do. Some of the tools will certainly make for better bread, but I wanted to be sure that I still would want to do this after making a few loaves. After several attempts, I would say it’s a go. I really recommend this book–though five minutes? Not really. Five minutes to make the dough. Then it sits. It sits on the counter. It sits in the fridge, and then on the counter again. It does take a lot less time and is a lot easier than I thought it would, but I am far from perfecting it. Oh and I’ve added “exploding a baking dish in oven” to my repertoire of kitchen disasters. Still not as exciting as the “boiling egg in microwave, which resulted in blowing up microwave and having egg/water solution ooze out of cracks debacle,” but pretty high on the list.

This book will have you baking bread  successfully, without an expensive bread machine. It’s concise and organized in a way that a newbie can get to making bread pretty quickly.  Definitely let your dough sit overnight in the refrigerator–much easier to work with. And I also agree the bread tastes better when the dough has been in the refrigerator for longer than 1 day. We’ve only tried one recipe, but have used it to make pizzas, calzones, and bread sticks, in addition to the round artisan loaves. We recently purchased a bread stone, which does help in the bread making adventure, so I would recommend that.  I can’t wait to try more dough recipes in the coming year.

Here is my first little loaf.

artisan bread making Avery Lane Blog

This is the first pizza I made. Normally my husband makes the pizza, using store-bought dough. He’s kind of a pizza snob expert (he worked as the manager of a pizza place while going to college) He is a definite critic. It passed 🙂homemade pizza using book artisan bread in 5 minutes a day

I’m happy to have tried. I’ve been doing so many new things in the kitchen lately and it’s been proven to be a great thing. I guess I always felt intimidated. I’ve been pinning away on pinterest, and trying loads of new recipes and new kinds of foods, like these apple fritters, from seemingly greek. {{Oh my! you must try these. Seriously easy–seriously good! My family ate them up like nobody’s business 🙂 }} Thinking about all the new things I’ve been trying,  when I saw a quote by author, Neil Gaiman, for New Years, I thought I would share it, because its idea is important.

“I hope that in this year to come, you make mistakes.
Because if you are making mistakes, then you are making new things, trying new things, learning, living, pushing yourself, changing yourself, changing your world. You’re doing things you’ve never done before, and more importantly, you’re Doing Something.
So that’s my wish for you, and all of us, and my wish for myself. Make New Mistakes. Make glorious, amazing mistakes. Make mistakes nobody’s ever made before. Don’t freeze, don’t stop, don’t worry that it isn’t good enough, or it isn’t perfect, whatever it is: art, or love, or work or family or life.
Whatever it is you’re scared of doing, Do it.
Make your mistakes, next year and forever.” -Neil Gaiman

Not sure I’m changing the world with the making of bread and pizza, but it has changed things around here.  I guess when you think about it on a deeper level, maybe I’m changing my kids’ worldviews and perspectives.  But I’ll save the social commentary for another site.

What are some new things you would like to try this year?

Happy bread making! And more importantly, happy mistake making!

~Erin