Seasonal Designing: Teacher Gifts, Summer Reading Programs, and Sewing Classes

I am teaching several sewing classes throughout the summer and have been designing some projects for them. I always feel like this local shop has new and unique examples hanging around and I wanted to be consistent with their style. It can be challenging to come up with cool designs to teach beginning sewists.

I kept coming back to this idea of a book shelf quilt that I had seen years ago, over at Don’t Call Me Betsy Blog. I really love the look of her quilt and thought the use of those selvages was way cool 🙂 I’m so glad that I bookmarked her blog post. She has a great blog, btw, and a new book coming out this fall (wtg!) I remember seeing a book shelf bag on a sewing forum last year (?or the year before that?), but I failed to book mark it and can no longer find it. Isn’t that the way it is? Most often, when I finally want to make it, I can’t find that internet-based-inspiration I need to make things easier. And yeah, I checked–not on my pinterest lists either.

The more I thought about this bag, the more possibilities I could see for it and the less likely that I could let it go. I thought it would make a perfect project for the beginning class for grown-ups that I’m teaching, so I adapted this idea into a bag. But I needed to make it easy for beginners and reduce the amount of steps for time’s sake.

So I got really excited with the idea of using this style for toting library books back a forth this summer–we always go more often: more time and because my kids participate in the summer reading program. I thought of all those books fitting into my awesome bag and I got a bit carried away…just a bit. I neglected to consider its weight…I made this ginormous (is that a real word now?) bag and thought “omg, duh.”

Avery Lane Blog wordpress Leaning book shelf bag sewing pattern

Meet our new book shelf pool bag–bc this is way too embarrassing to gift to someone.

After several complicated versions, this is what I’ve come up with for the class, which I’ve also made available in my pattern shop.

Avery Lane Blog wordpress Leaning book shelf bag sewing pattern

And then a sample project to hang in the shop.
Avery Lane Blog wordpress Leaning book shelf bag sewing pattern

My daughter wants one for herself, which I feel is such a genuine compliment. I might make her bag with the selvages like Elizabeth over at Don’t Call Me Betsy did. I also plan to make some as teacher gifts this year. I always try to come up with crafty ideas that also have some practical use. Our town has banned plastic grocery bags (yay!), so we can all use more reusable bags. And most of my kids’ teachers have young kids, who no doubt will need their own bags for their load of library books.

What are you giving the teachers this year? I’d love to have more ideas for future crafting and gifting 🙂
~Erin

A Lined Backpack– just for teens

Teaching teens to sew can be a challenge, because most teen girls want to sew clothing. As a teacher, I want them to be happy with what they’ve sewn. If they like what they’ve sewn, it motivates them to sew more and build on their skills. Clothing as a first project for teens most often doesn’t work well for a couple reasons.
1. the style they can master is not usually very stylish
2. clothing isn’t very forgiving and can look/fit awkwardly if not sewn precisely

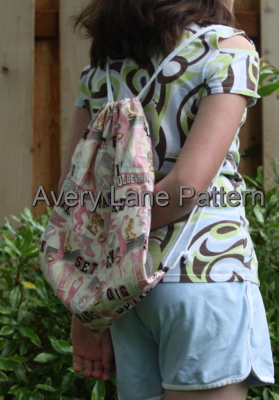
Accessories are the perfect solution 🙂 There are several accessories that work well for beginning projects. With summer in mind, I designed this lined backpack for a class I teach locally. It’s a perfect first project for teens and adults, who are just starting out. And it pretty much always looks good and is something that gets used a lot by the sewist.

Another key to sewing success for teens and younger kids is fabric. Allowing kids and teens to choose the fabrics for themselves makes the project personal. They will be more likely to feel good about the project, as well as use it.
Avery Lane Blog drawstring backpack pattern

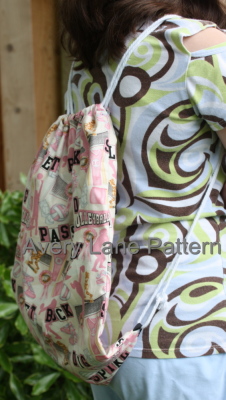
I used this brilliant fabric from RJR fabrics. It’s perfect for the sporty girl 🙂 The collection has soccer, softball, and cheerleading prints as well.
Avery Lane Blog drawstring backpack pattern

Through my etsy shop, a lot of people contact me wanting a lined drawstring backpack pattern, so I came up with one. It’s now worked out and available for purchase. My Cinchy Cinch Sack, which is an unlined drawstring bag, is still available and great for younger sewists to sew as one of their first projects. I will be teaching both bags this summer in a local sewing shop. It’s great to have choices!

~Erin

Pressing Hems and Casings: DIY Ez-Hem pressing guide

I love my EZ-Hem–did you know it used to be spelled EZY-Hem? And that credit was given to Edna Bryte Bishop? And that it used to cost only $1.25? Fun facts I found out when I chanced upon this great find at my local thrift shop:
vintage Ezy-Hem Avery Lane Blog

As stated, I do love my Ez-Hem, but find it is not a good tool for kids to use. It gets hot while in use and they can’t hold it without possibly burning their finger tips. When I’m teaching kids sewing classes, I like to bring my handmade pressing guides. These are much easier for the kids to use (no more burned finger tips).
EZ-Hem

They are super easy to make. I use file folders, but any card stock will work well. Make sure its edge is straight. Cut with a rotary cutter and straight edge if needed.
pressing guide diy

Use a clear straight edge to mark folding lines.
HandMade EZ-hem

make  pressing guides

In the class I will be teaching, the kids will need to press the casing 3/4 inch, which the EZ-Hem doesn’t have this measurement marked anyway. So I made one specifically for the class I am teaching:
hand made pressing guide

To use the pressing guide, place the card stock on the wrong side of the fabric, fold over the fabric to the pressing line needed, and press it with the iron.

**Make sure you supervise kids while they are using the iron. I have never had the card stock start to brown or burn, but it’s important to be cautious.**

how to use pressing guide to press hems or casings

how to use pressing guide to press hems or casings

Enjoy!
~Erin

Shorties: a DIY project tutorial

Those Matilda Jane shorties are so darn adorable and look super comfy; it’s no wonder they’re so popular with kiddos. I could see my daughter wearing them throughout the summer. But I’m having a hard time paying over $30 for a simple pair of knit shorts with ruffles. I figure I could make some knock offs pretty easily. So I set out and researched shorties by looking on the Matilda Jane website, as well as on ebay. Disclaimer: I have never seen a pair irl. Here’s my knock off pair:

shorties

shorties

From what I can tell:

  • Shorties are made with lycra knit fabric (content tags), which makes sense–they won’t get the saggy back side look while she’s climbing trees, riding bikes, or sitting in the grass making daisy chains with friends.
  • Shorties appear to not have a side seam, just an inseam
  • Shorties are  not super short, but not long either: also a nice fashion statement.
  • Shorties have 2 rows of ruffles along the hems–not huge, but not super narrow. The lowest ruffle hangs over the hem and the ruffles are gathered closer to the top, not down the middle of the ruffles.
  • The edges on the ruffles are unfinished, which is fine since knits don’t fray or unravel.
  • Shorties are not super tight fitting like leggings (modeled shots on web), which is good for us– my girls strongly disagree with wearing leggings as pants. Leggings are meant to go under skirts, tunics etc– not stand alone fashion.

After considering all this, I decided the fit is similar to yoga pants– somewhat fitted, but not super tight. At least this appeals to both me and my daughter. She loves the way her mama-made yoga pants fit (not overly tight like the ready wear ones in the stores). She wants to wear them with shirts, not tunics or dresses. My girls strongly disapprove of wearing leggings as pants, as they feel leggings are not a stand alone fashion.

get ye a pattern

get ye a pattern

I altered the pattern for the correct inseam (how long we want her shorties to be).

they need to be short to be shorties :)

they need to be short to be shorties 🙂

I used a light to medium weight cotton lycra. A heavier weight would not give us the look we were going for. Fine for yoga pants, but we wanted the shorties to have more movement and a very slight baggier look.

Cut out the shorts first.

cut out the fabric pieces

cut out the fabric pieces

Now for the ruffles.

The ruffles: I decided to experiment with the ruffles, to get the most in the way of comfort. My daughter is really active and has tactile sensitivities.

First off, I felt that 1 to 1 1/4 inch wide strips were not wide enough. I cut the strips 1 3/4 inches wide, because I felt 2″ were too much for the shorties 🙂

I also cut them the width of fabric (perpendicular to the selvage edge), not the length. This is very important, because I want the ruffles to behave a certain way. From looking at the auctions selling used shorties, the tops of the ruffle should curl a bit and I’m not sure it would look the same if I cut along the grain of the fabric.

cut the strips for the ruffles

cut the strips for the ruffles

Sew the side seams (skip this if you are using a leggings pattern), and hem the bottoms. Technically you don’t need to because the ruffles hide the hem line, but I like things to be finished. I just did a quick zigzag stitch hem, since it won’t show and I was feeling too lazy to set up a twin needle. Make sure you are using a stretch needle or ball point needle when sewing on knits.

hem the shorts

hem the shorts

Next I played around with the gathering method–there is always more than one way to do something. I tried gathering with narrow elastic and clear elastic. Regular elastic was too bulky and clear elastic, though less bulky, did not give me the results I wanted.

different ways to gather the ruffles

different ways to gather the ruffles

I shirred using elastic thread in my bobbin, which worked fine. Regular gathering also worked fine and gives slightly more control over how much gathering is going on. Both were suitable to do, since the gathering stitches would have to come out anyway. The ruffles will be sewn on using a zigzag stitch, so having some stretch is not an issue. (See my ruffle leggings tutorial here).

In the end, I did shirring with elastic thread, 2 rows, 1st row 3/8 ” from the top edge—because it was the fastest method and the ruffles would be somewhat uniform without much work. Just be sure to steam the shirring before sewing  them to the shorts.

ruffles!

ruffles!

Pin and sew the ruffles onto the shorts, but do not sew over the pins. Make sure to use a zigzag stitch to allow the fabric to stretch without breaking threads.

first sew the lower ruffles

first sew the lower ruffles to right side of shorts

sew the 2nd row of ruffles

sew the 2nd row of ruffles

Sew the inseams and crotch seam.

inseams

inseams

sew the crotch seam with right sides together

sew the crotch seam with right sides together

Sew elastic to waist.

sew elastic

sew elastic waistband

Now gift them to someone cute.

front of shorties

front of shorties

back side

back side

I hope you enjoyed this tutorial for a knock off pair of shorties. If you give it a try, let me know how they worked out for you. I’d love to hear about it.

Happy sewing!

~Erin