diy Gottex Swim Skirt tutorial

Avery Lane Blog: Swim Skirt Sewing tutorialSwim skirts seem to be all the rage this summer. I especially love the Gottex swim skirts, but not so much the price tag on them. Whenever I see them, I think, “I could make that.” Here’s how I did it…

Swim Skirt with front slit

I want a front slit on my skirt, so I am using the back pattern piece from this tutorial and drafting 2 more pieces for the front of my skirt.

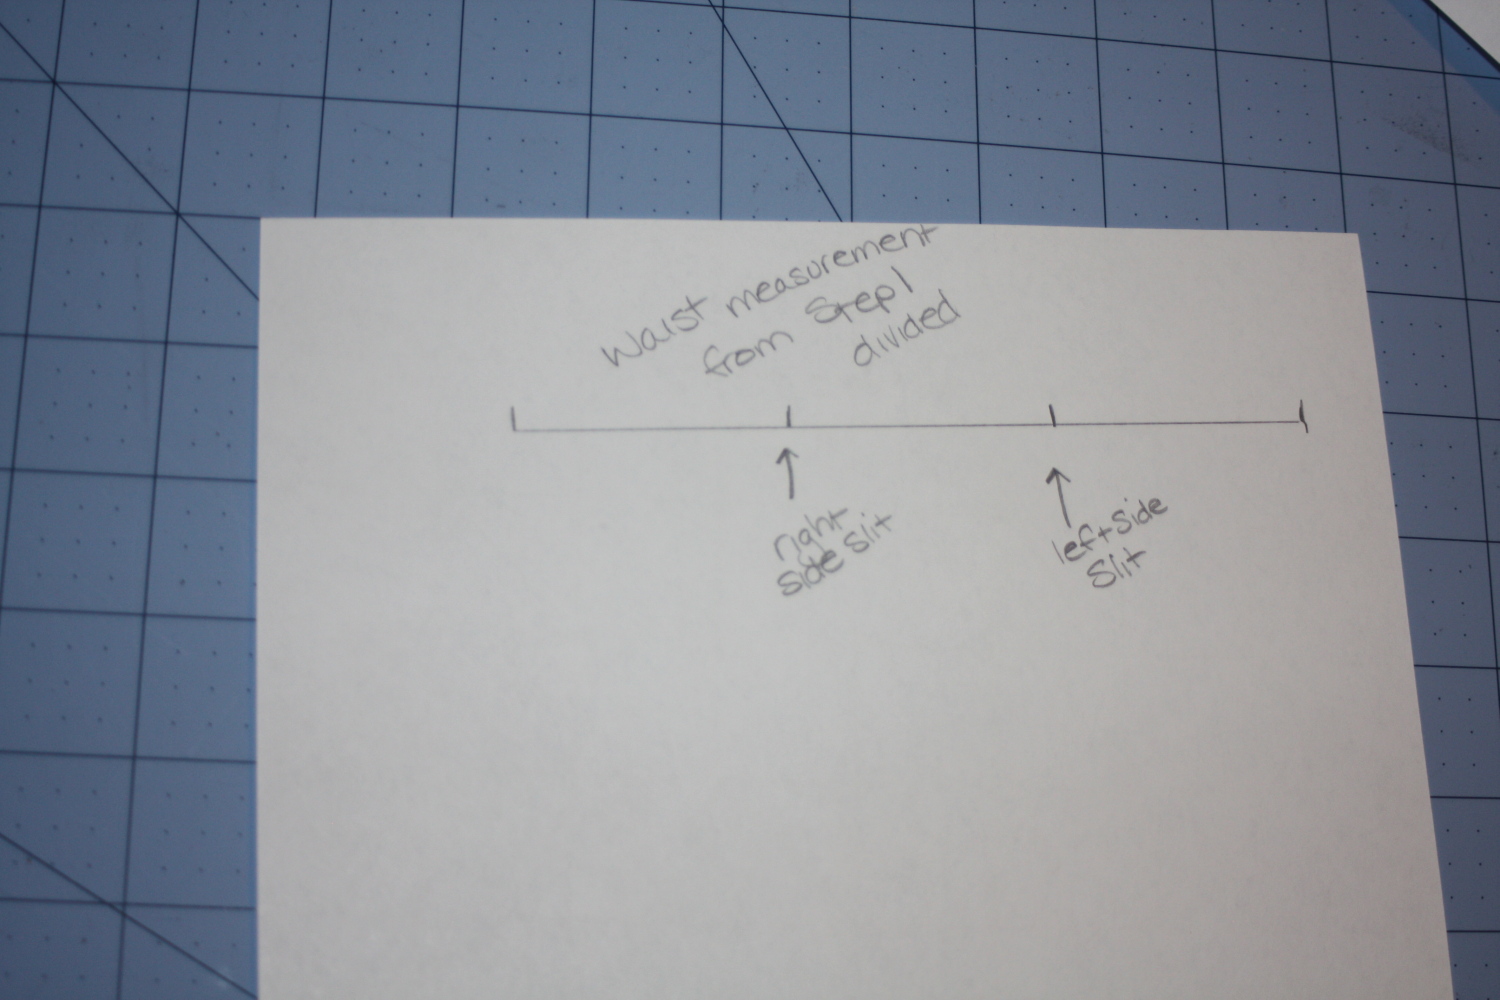
Take the waist measurement, subtract 1-4″ for negative ease. Divide that number in half. This is the front of my skirt measurement. Divide it by 3.

One side of the slit will be 2/3 of the measurement (Side A), and the other side of the slit will be 1/3 (Side B).
Avery Lane Blog swim skirt tutorial sewing

Side A(if more help is needed on these next few steps, see this post)

Step 1:
Add 3/4″ for finishing allowance to 2/3 of your waist measurement. Draw the top line this length.

Step 2
Draw a line perpendicular to the top line, the desired length. (same measurement as step 2 in the simple swim skirt drafting tutorial) and draw your bottom line perpendicular to the 2nd line you drew.

Step 3
Add 2″ along the bottom edge to make an a-line. Follow the instructions (step 3) from the simple swim skirt tutorial.Avery Lane Blog: Swim Skirt Sewing tutorial
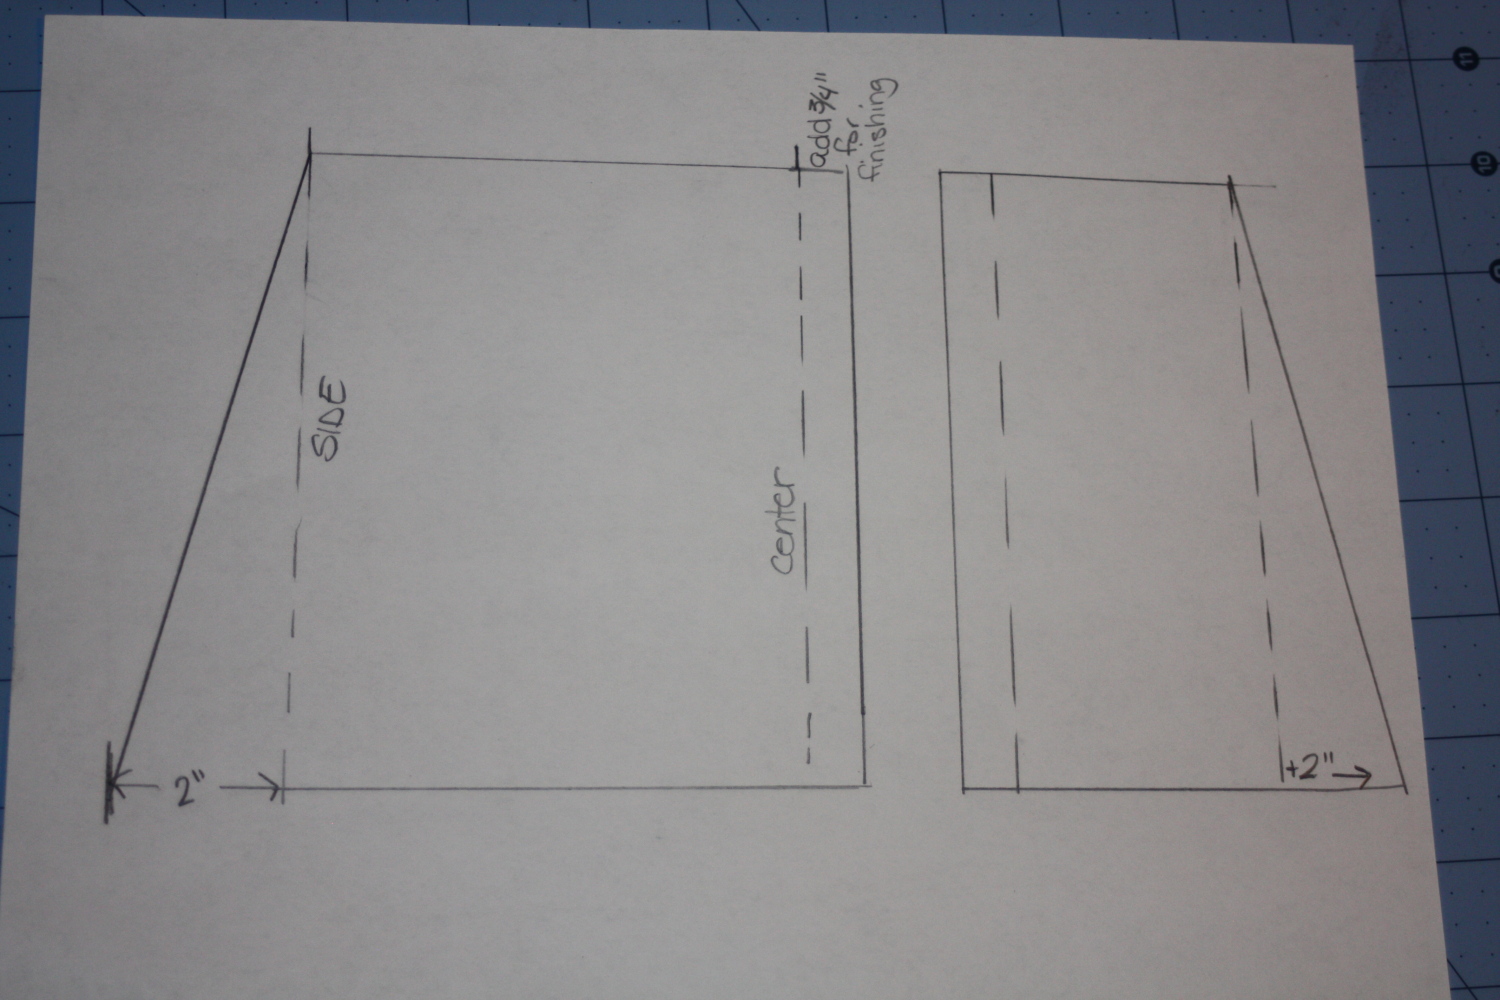
Repeat for Side B, using 1/3 of the front waist measurement and making it a mirror image of side A–so slit edges fit together, like this:
Avery Lane blog swim skirt tutorial

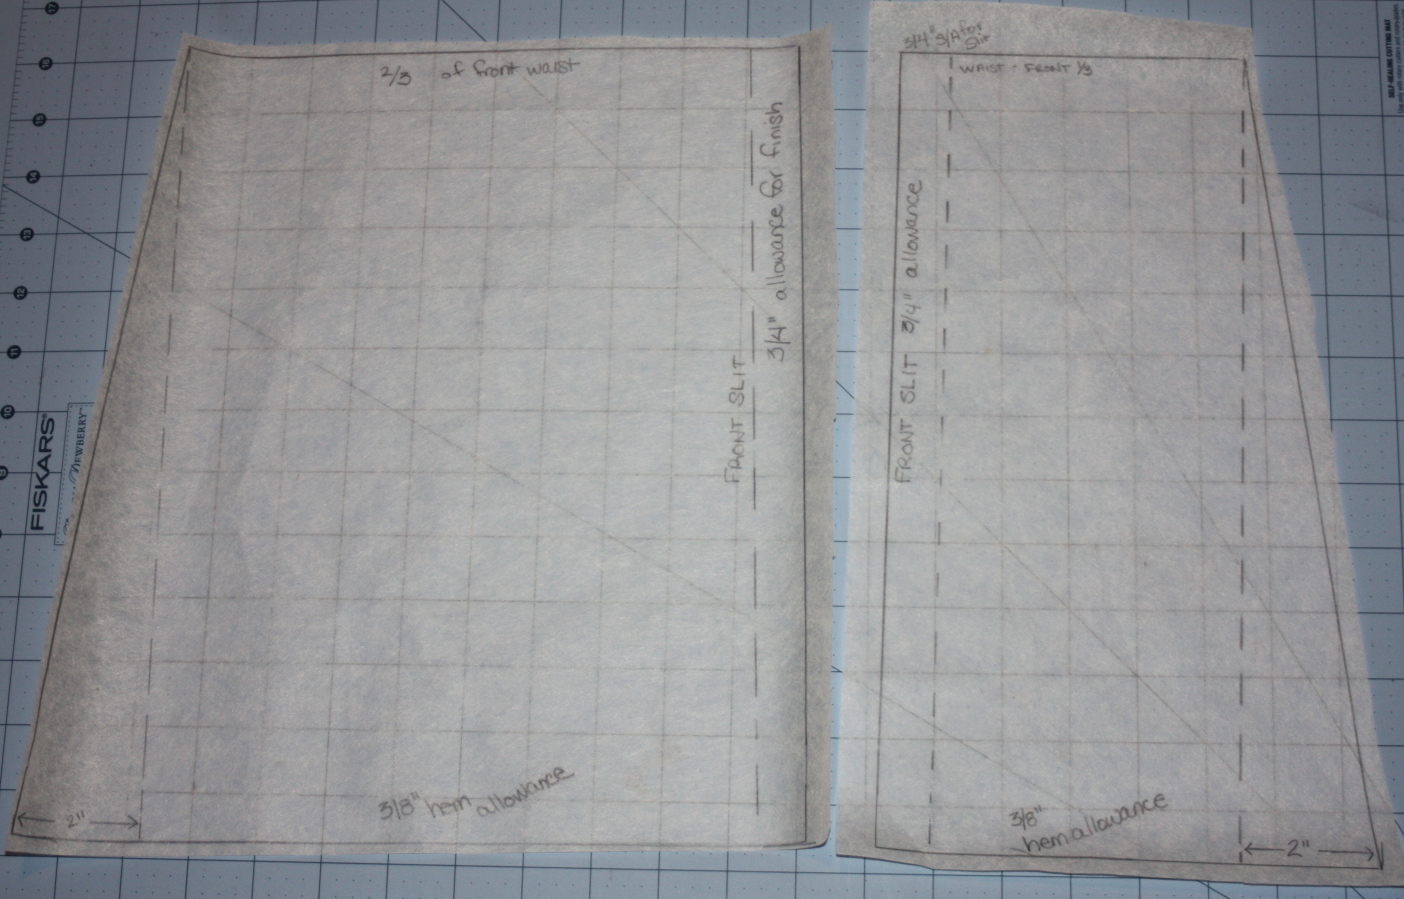
Use the patterns to cut out your fabric pieces.

Sewing a front slit swim skirt:

Step 1:
Finish the slit edges of Side A and Side B (fold the edge toward the wrong side and stitch in place).

Step 2:

Optional: Sew a zigzag stitch along the top edge of the slits, tacking them together at the top edge.

Step 3: sew side seams, waist, and hem (see swim skirt sew along here)

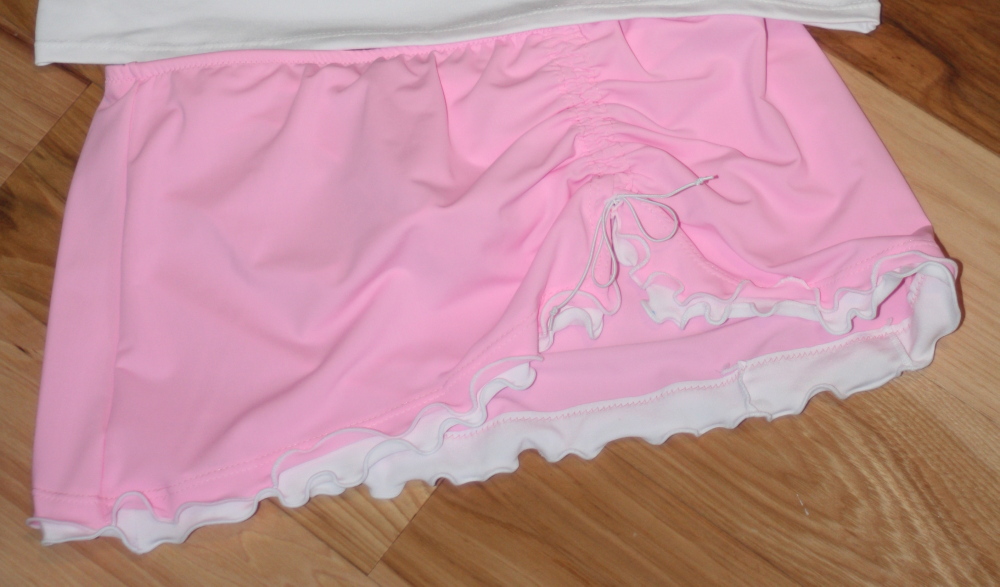
The Gottex Profile Ruffle skirt Knock-off:

Draft the pattern as direct for side-slit skirt above.
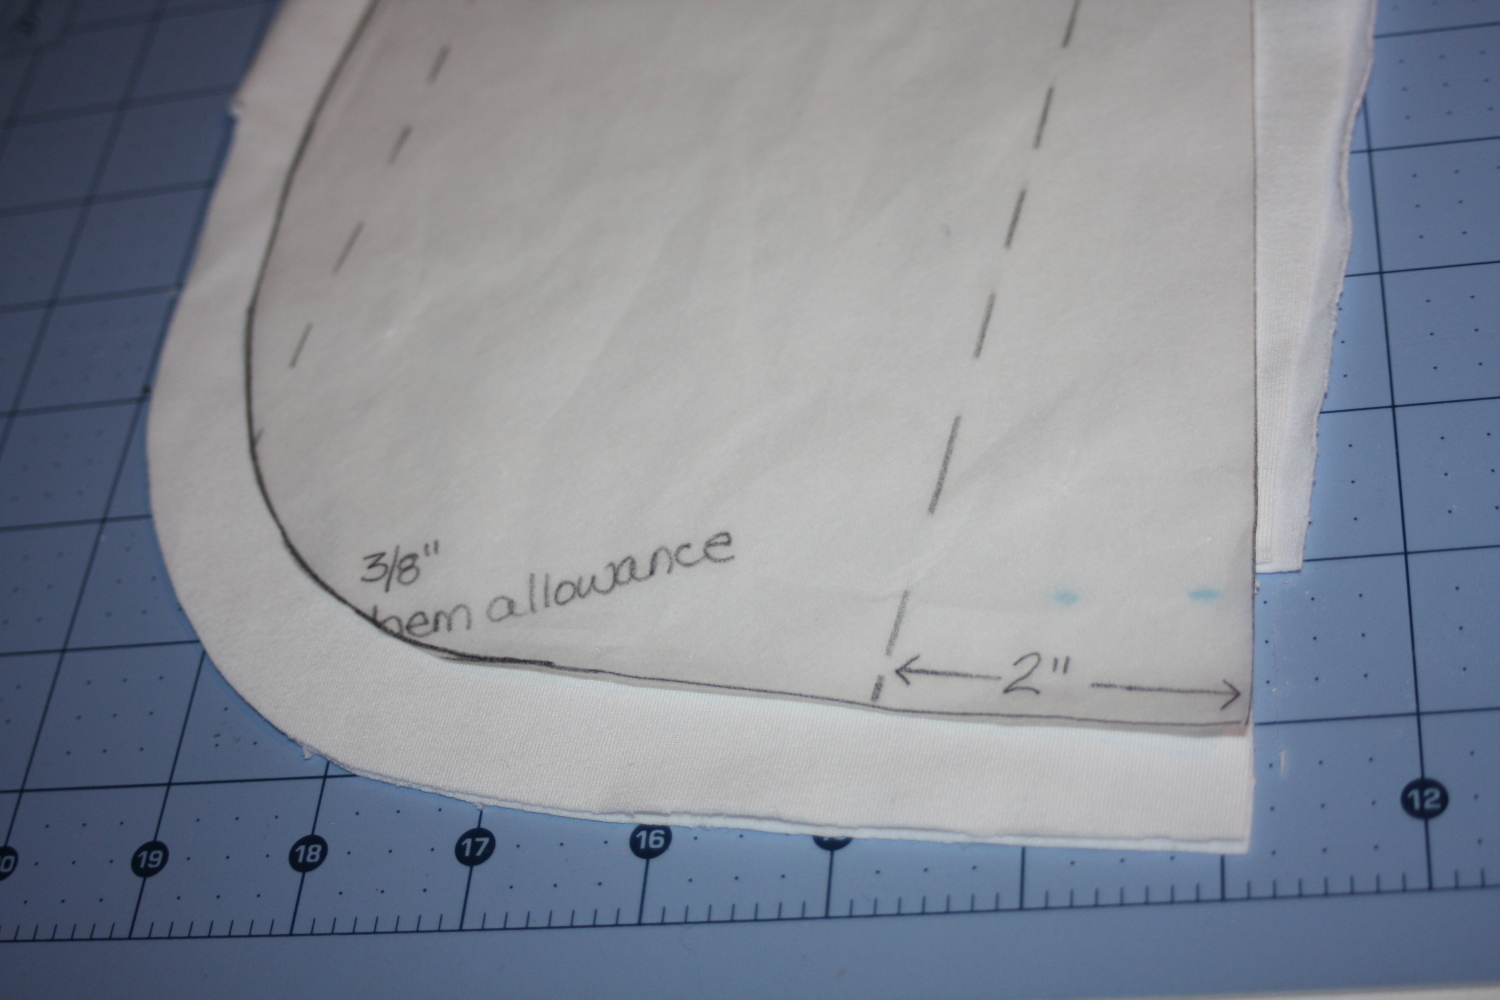
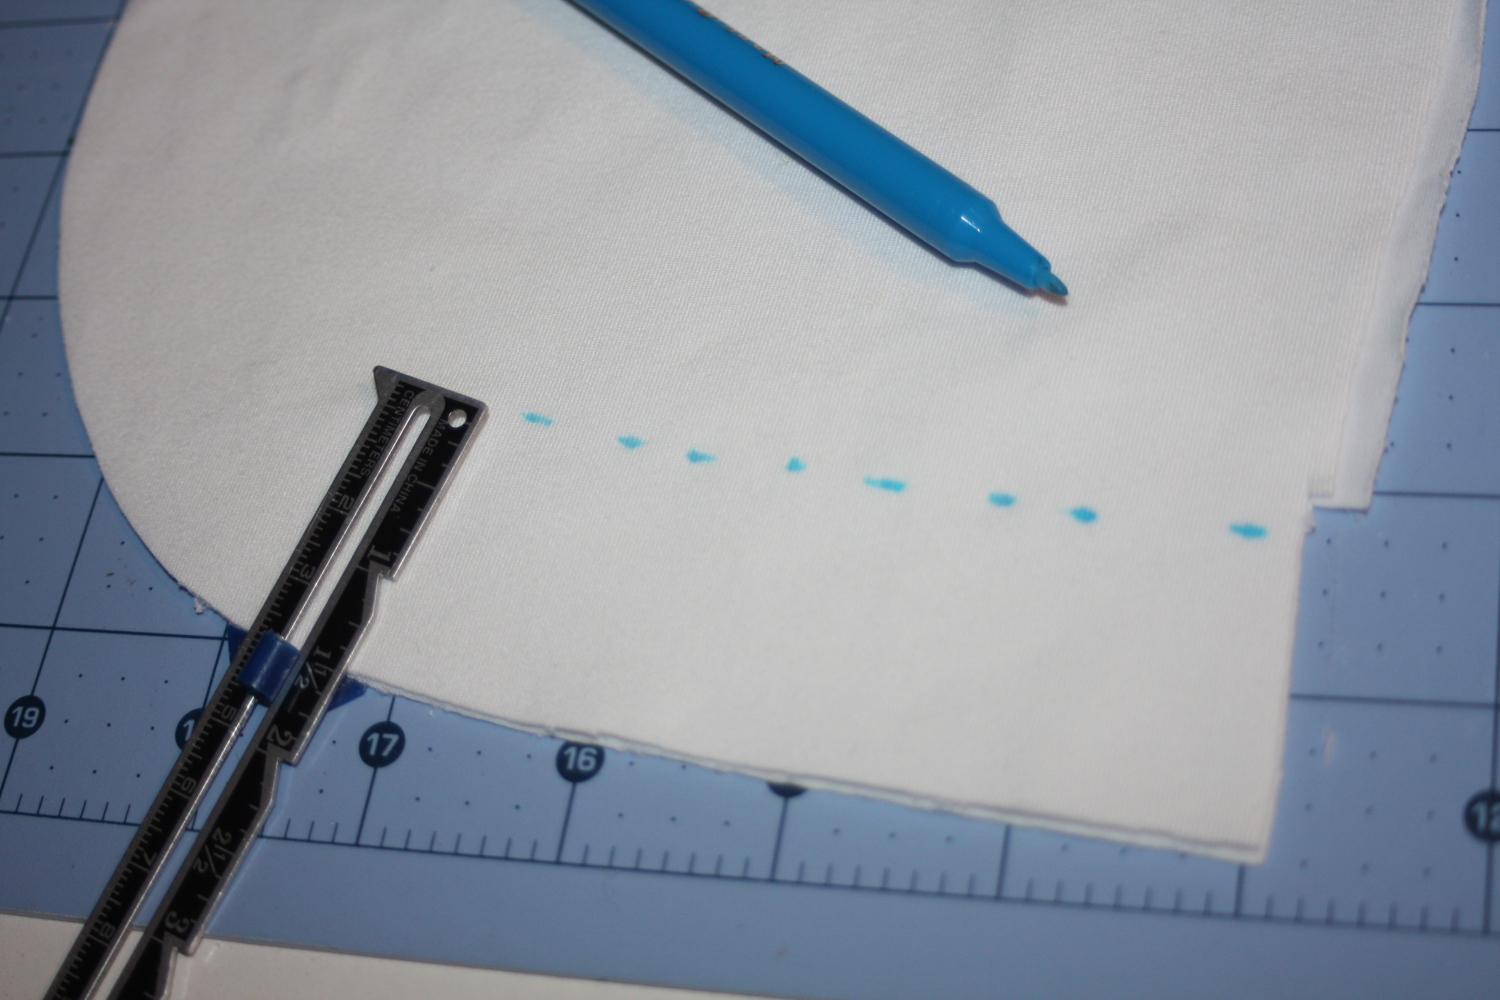
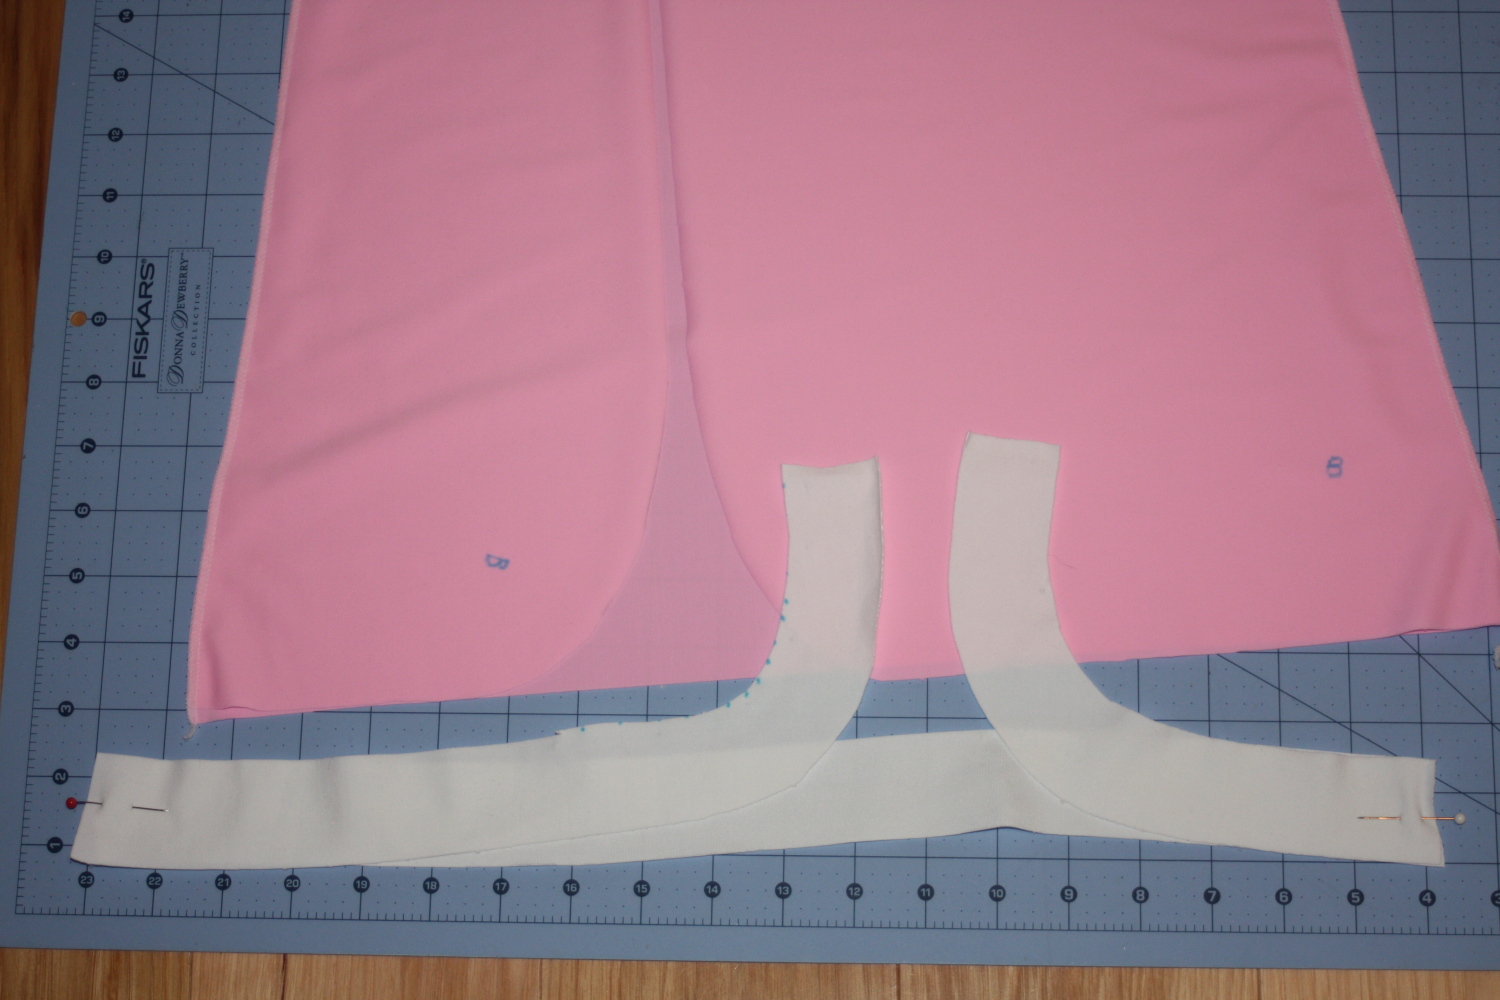
Step 1: round slits

Avery Lane Blog: Swim Skirt Sewing tutorial

Avery Lane Blog: Swim Skirt Sewing tutorial

Step 2: cut out contrast fabric for double ruffle hem (optional)
Avery Lane Blog: Swim Skirt Sewing tutorial

Avery Lane Blog: Swim Skirt Sewing tutorial</a

Avery Lane Blog: Swim Skirt Sewing tutorial

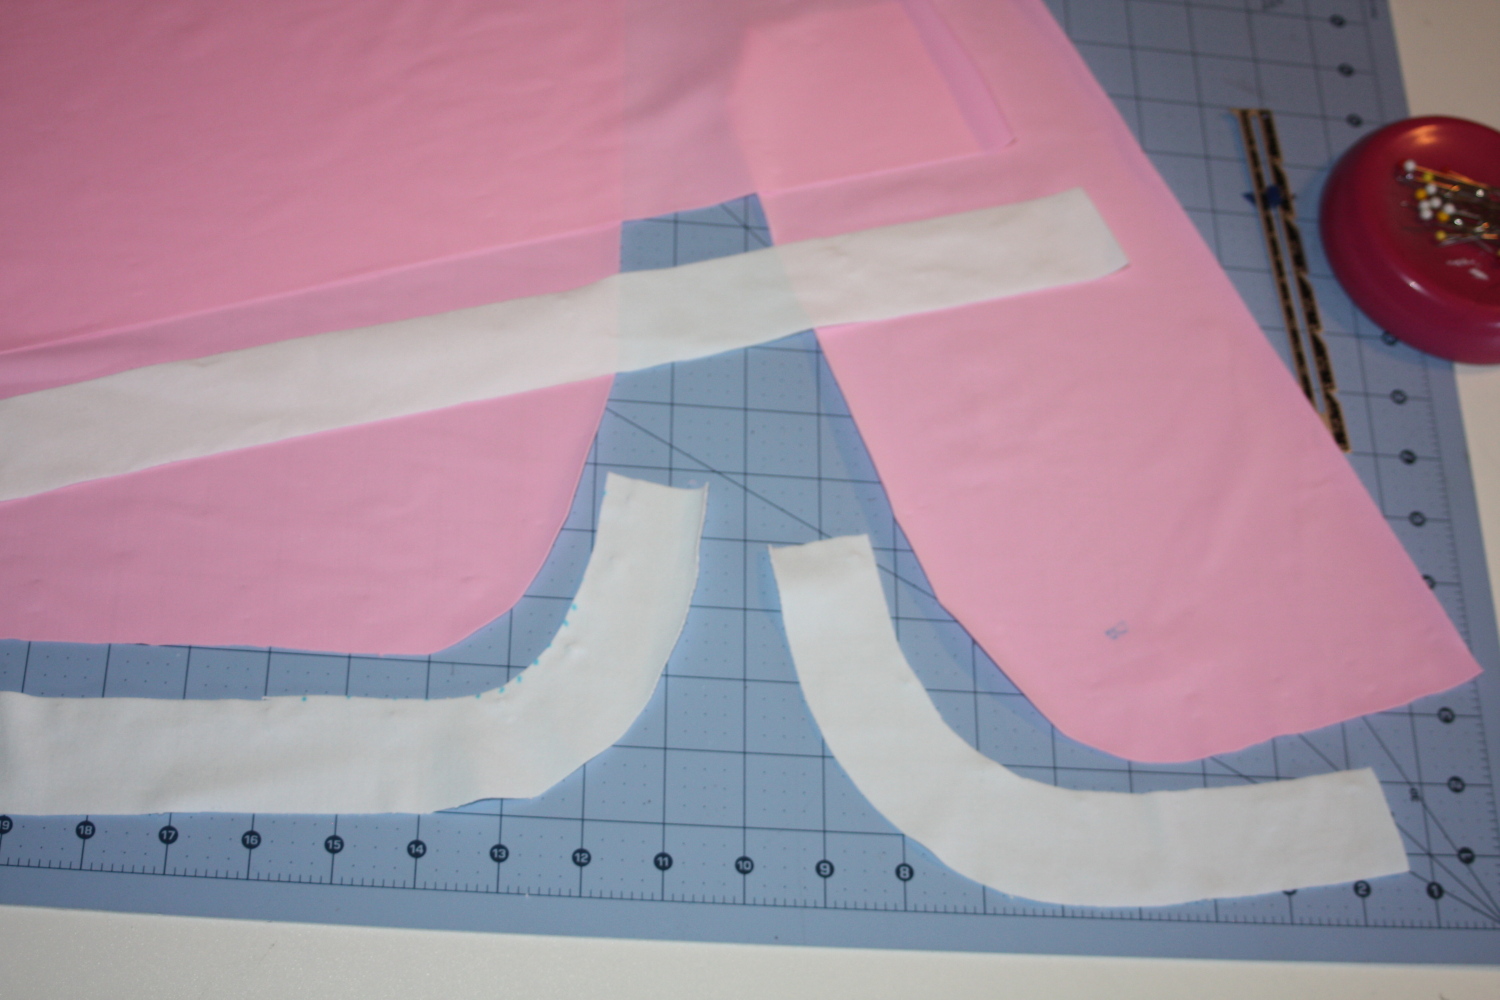
Step 3 sew side seams of skirt and sides seams of ruffle trim.

Avery Lane Blog: Swim Skirt Sewing tutorial

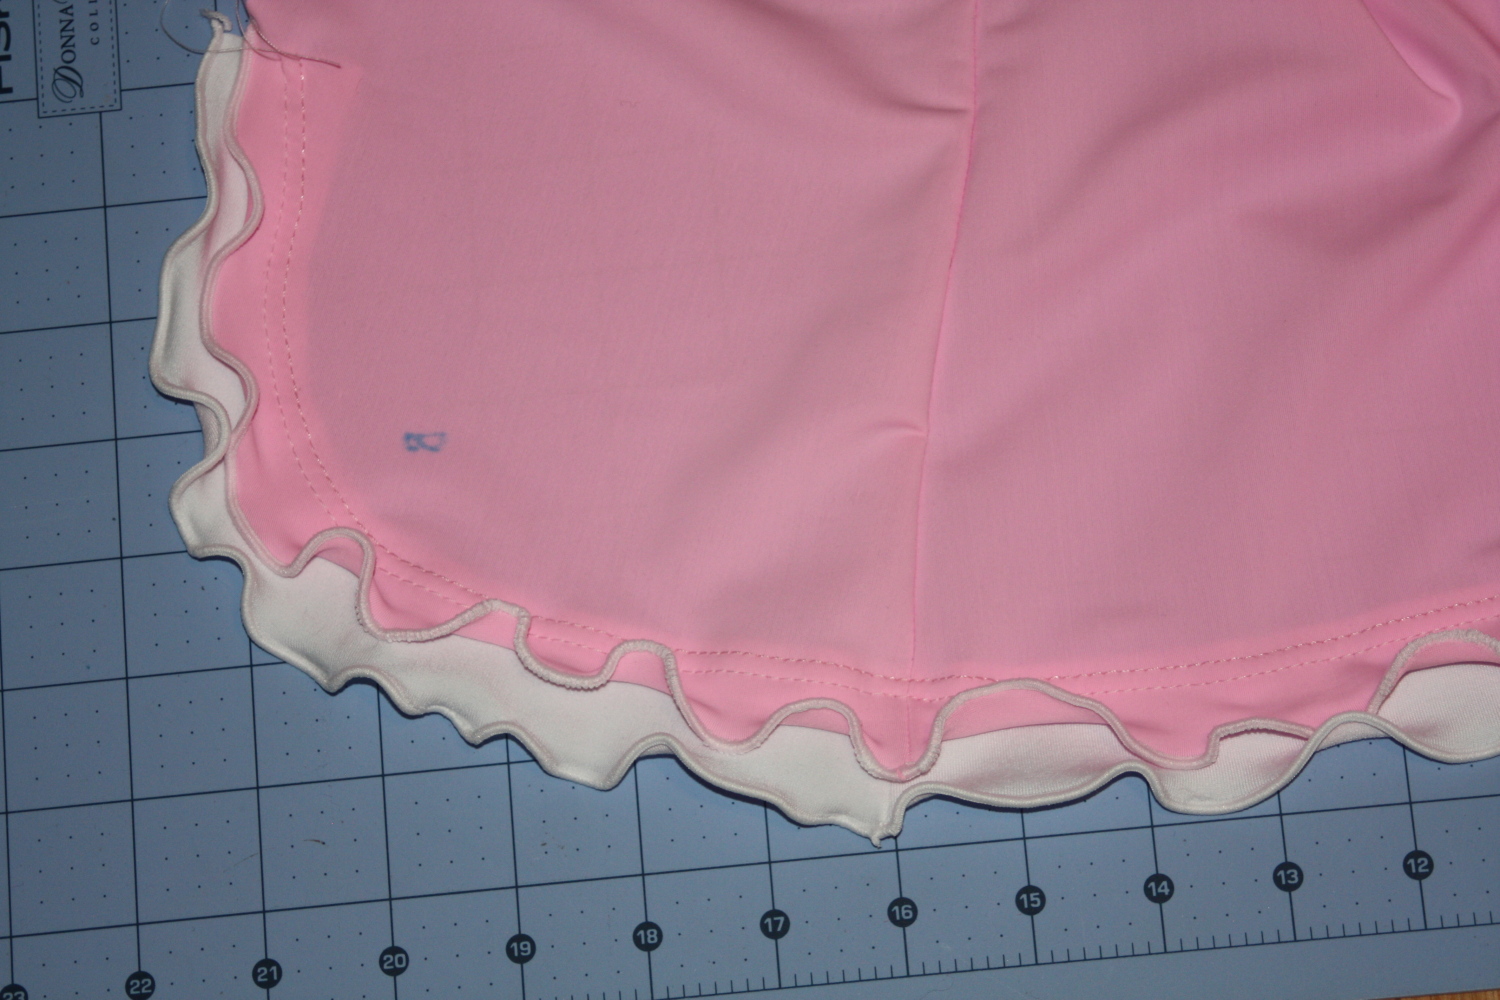
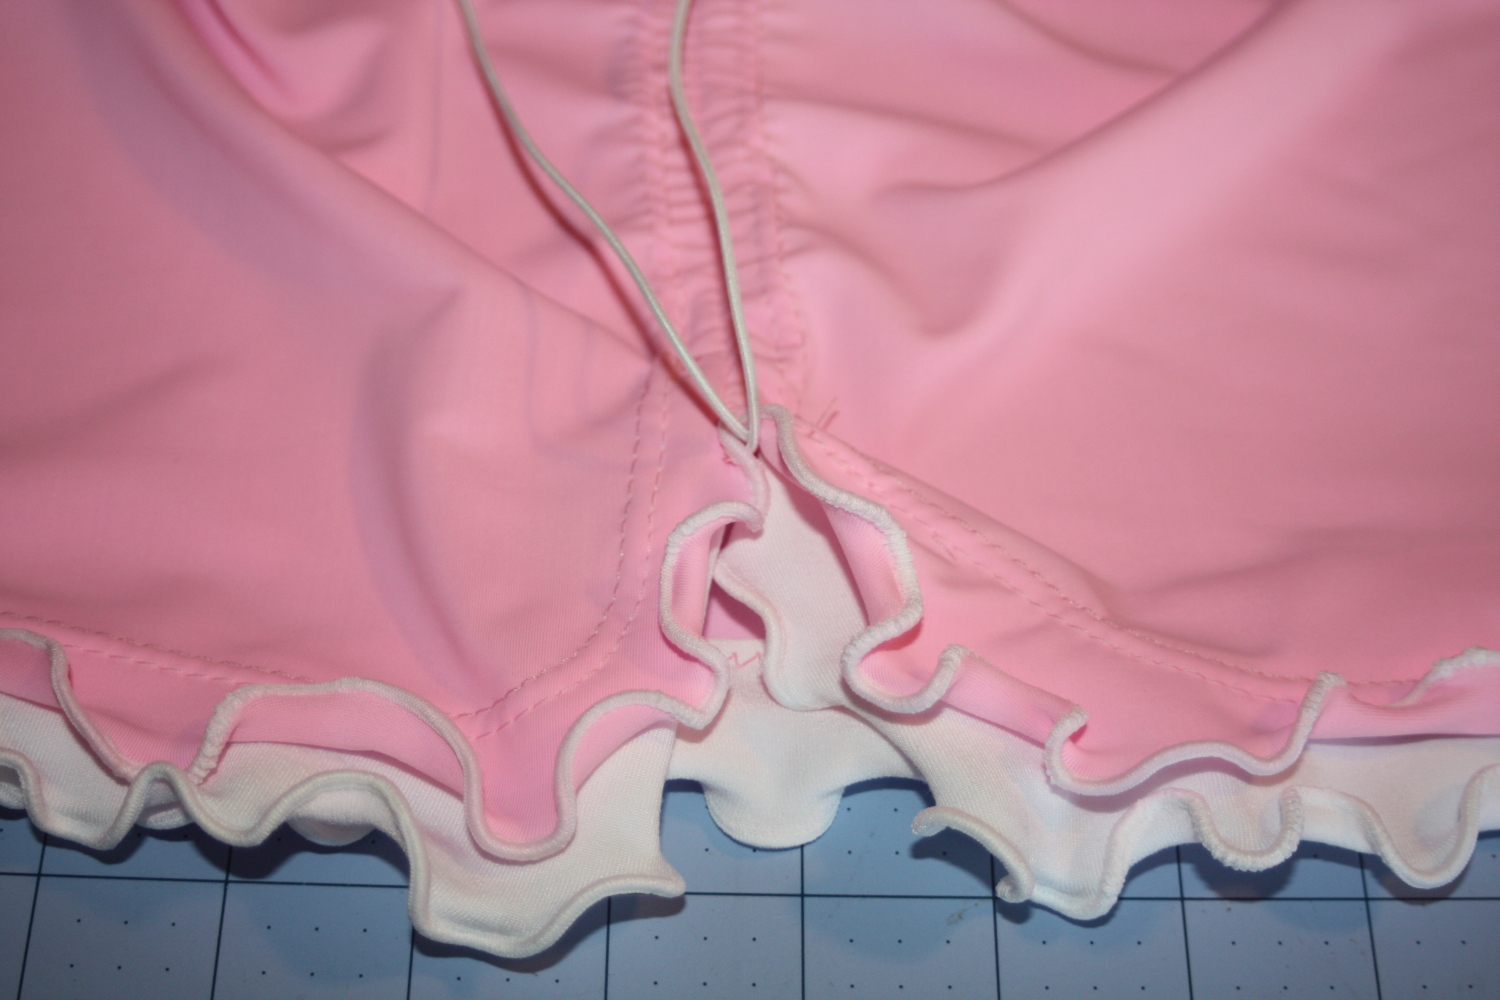
Step 4 use serger to finish hems of both skirt and ruffle trim. Use wooly nylon thread in loopers and rolled hem setting. Stretch fabric slightly as you serge the rolled hem to create a lettuce edge effect.

Avery Lane Blog: Swim Skirt Sewing tutorial

Step 5 sew ruffle to skirt, so that both ruffle and skirt have right side of the fabric facing up. Use a twin needle to sew them together.

Avery Lane Blog: Swim Skirt Sewing tutorial

Avery Lane Blog: Swim Skirt Sewing tutorial

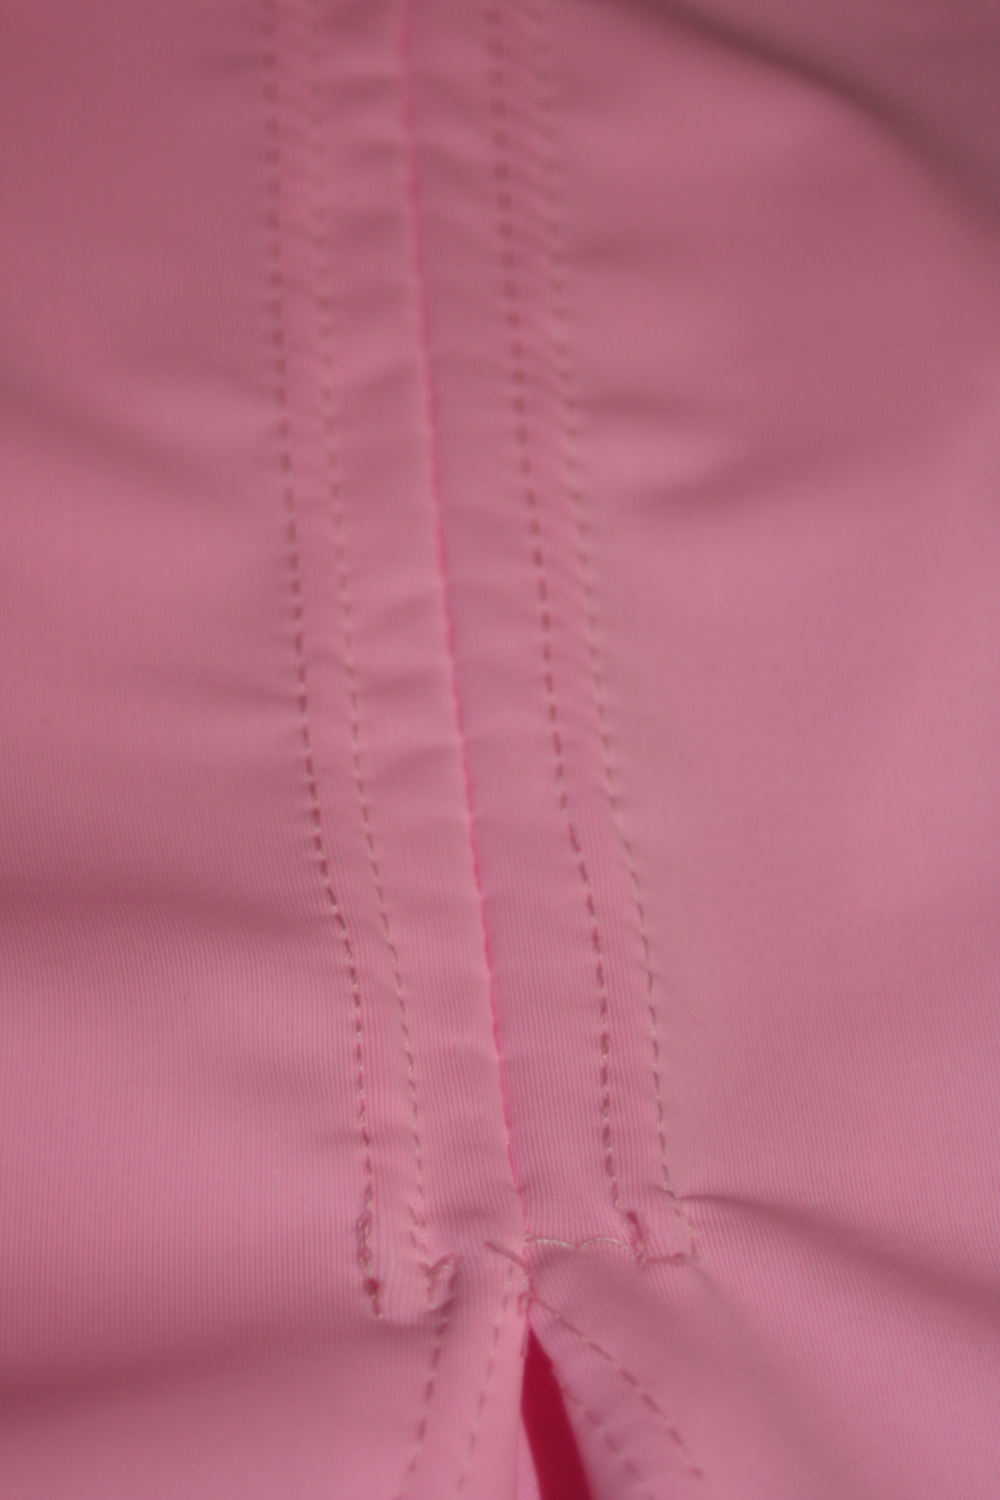
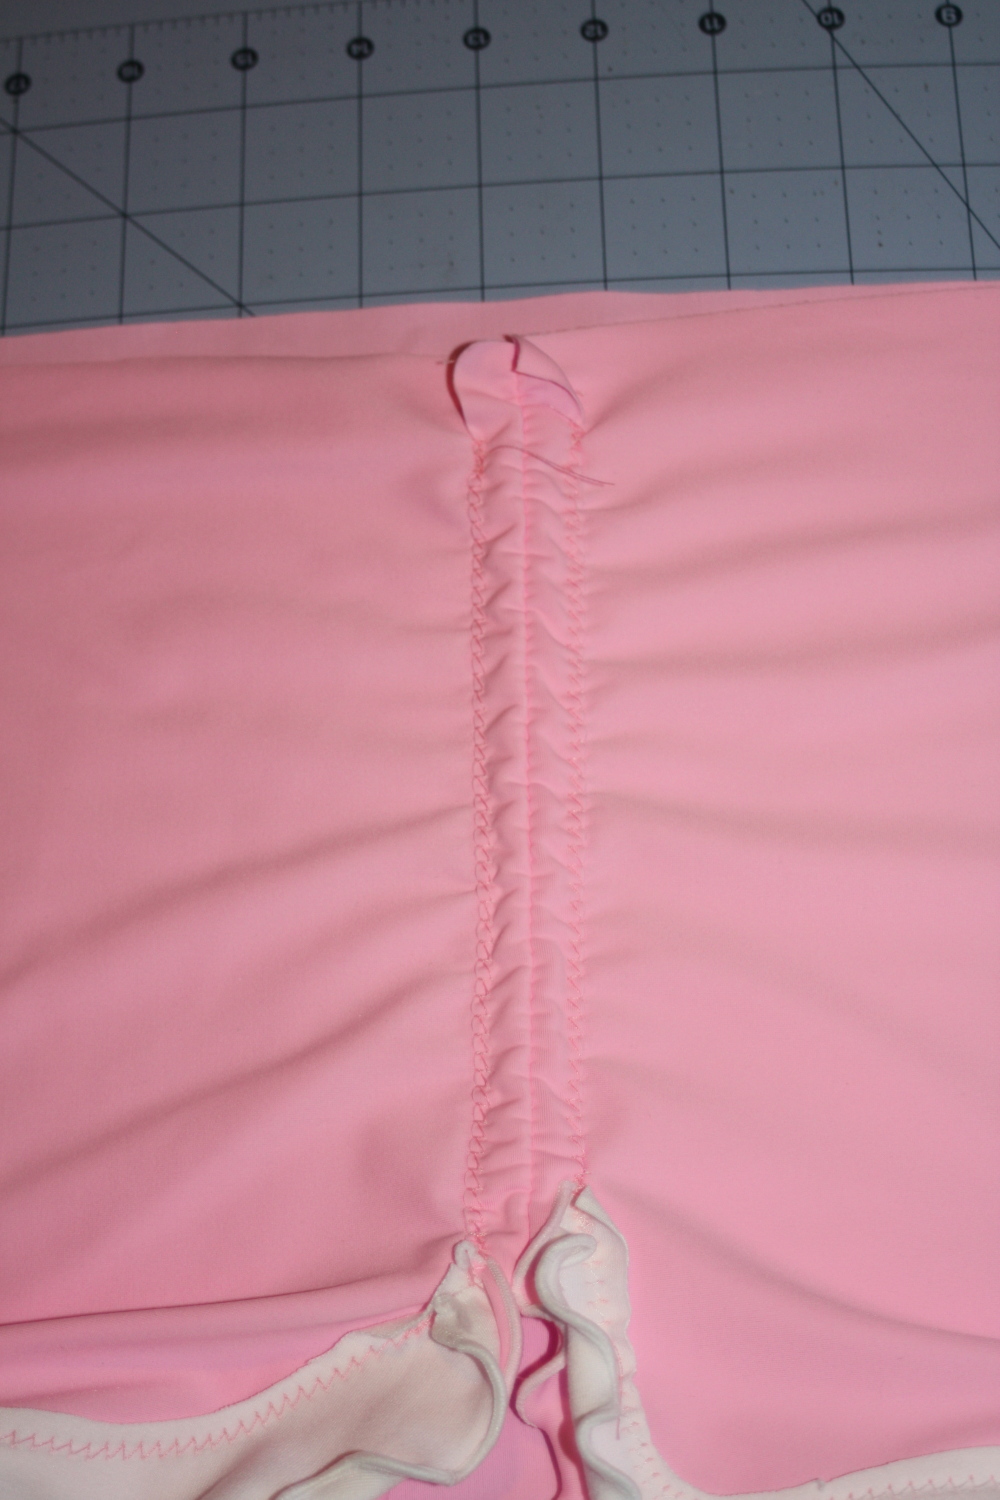
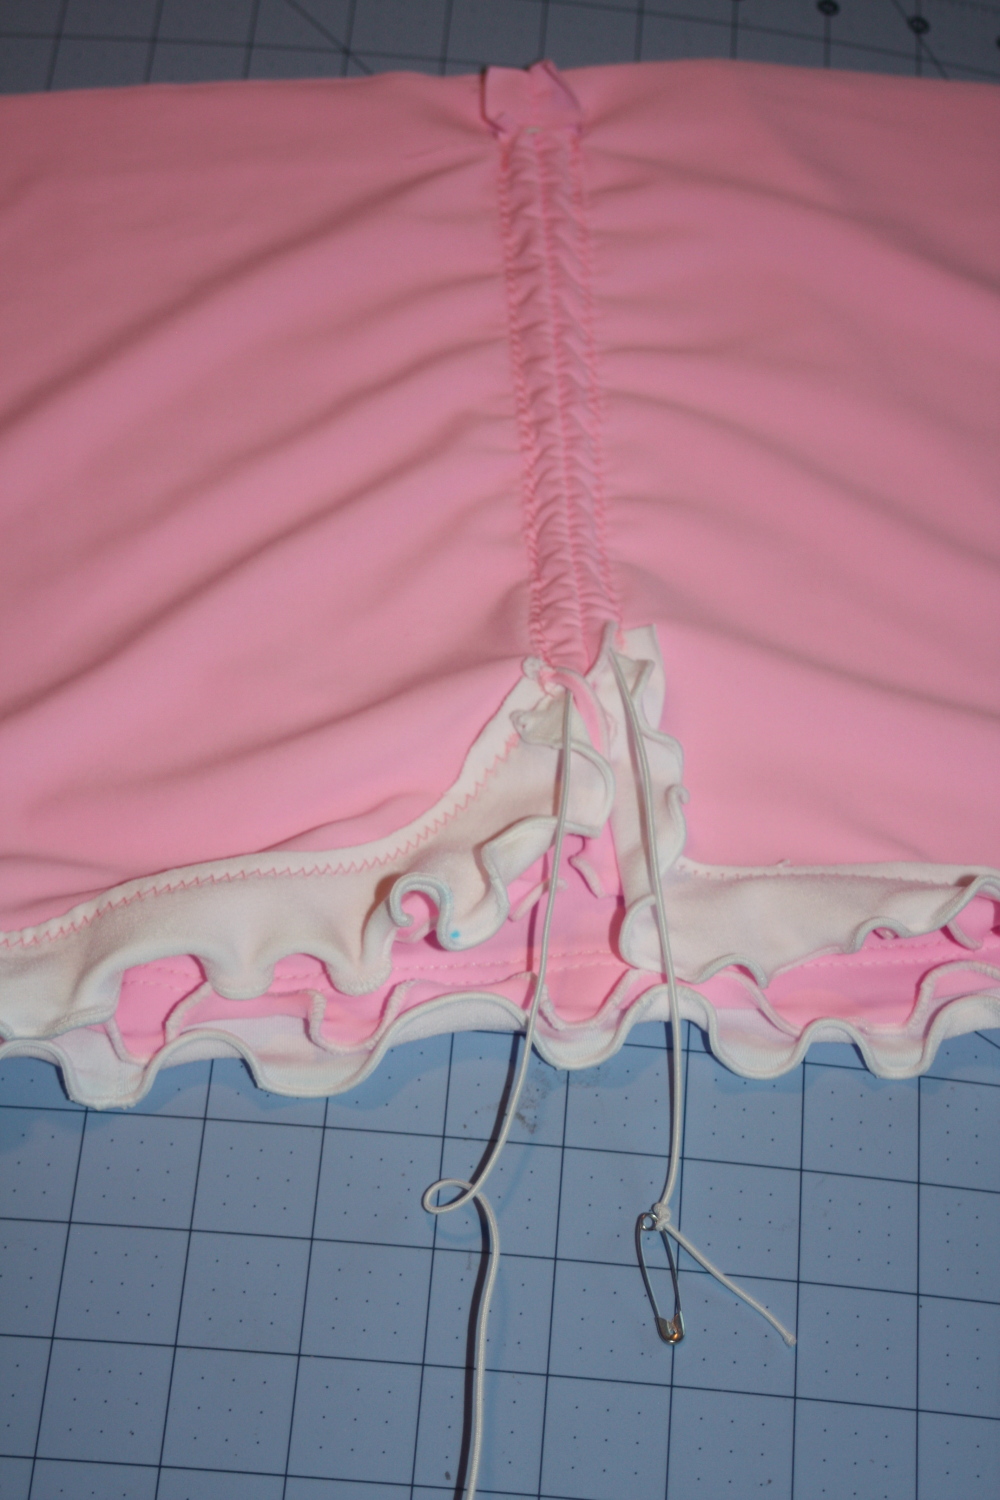
Step 6 sew side front seam using a stretch stitch or narrow zigzag stitch. Use a 3/4 inch seam allowance. Use a twin needle to sew the seam allowances open and create a casing for drawstrings. Don’t sew to the very top edge, stop and leave about 3/4″ unsewn. Clip the seam allowances right above the casings.

Avery Lane Blog: Swim Skirt Sewing tutorial
b2
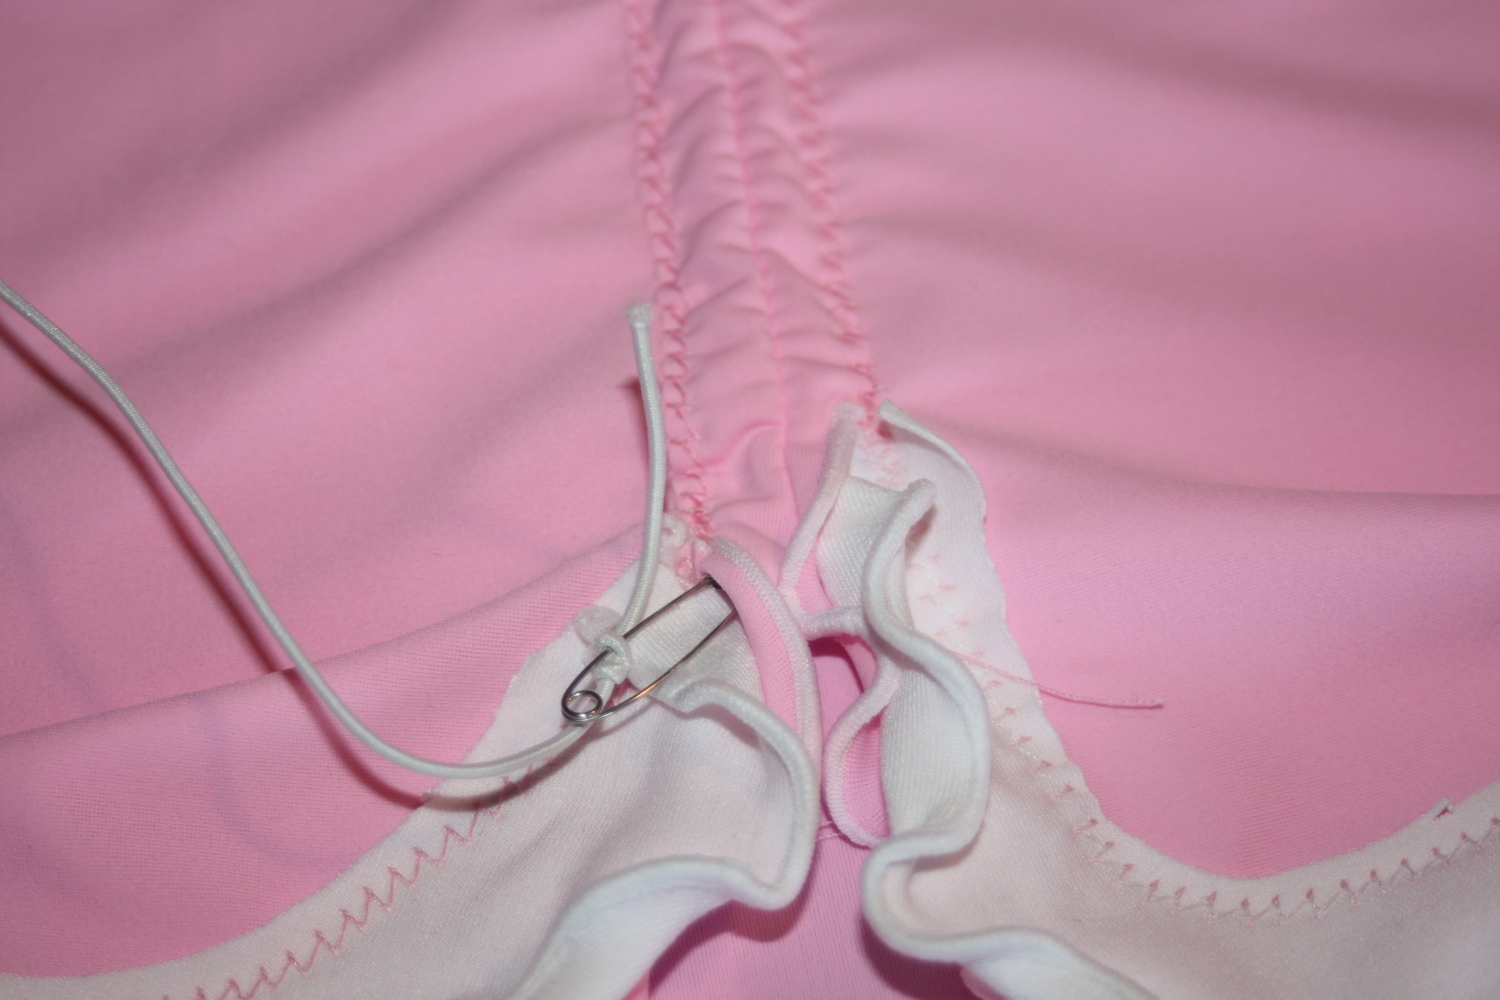
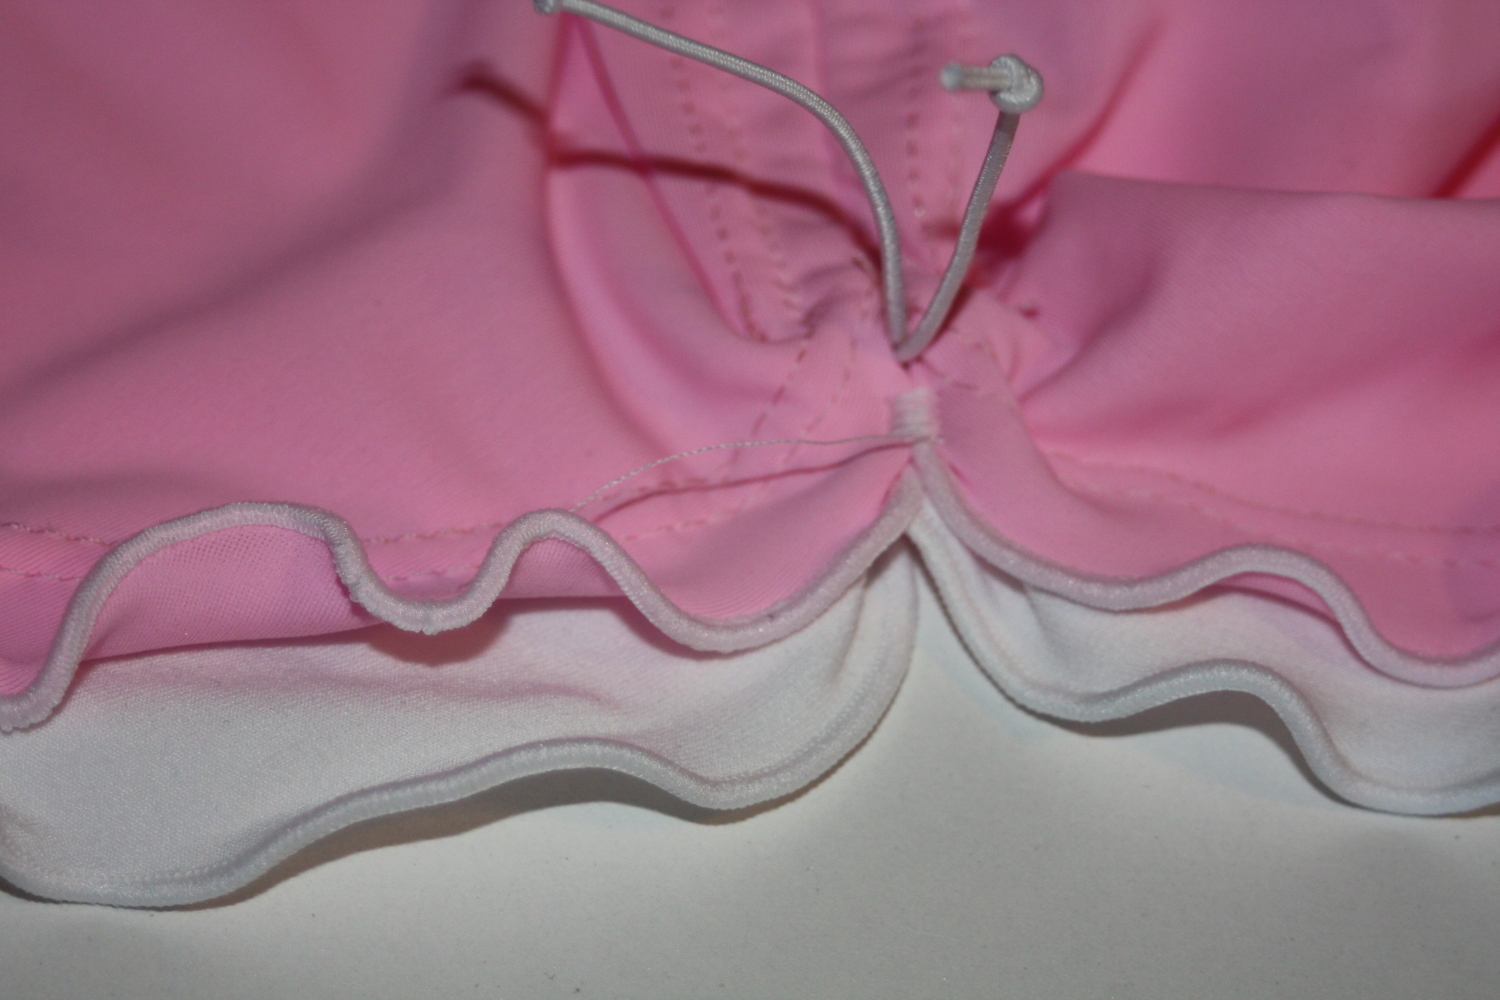
Insert stretch cording into bottom of one casing and feed it through to the top, down into the 2nd casing and all the way out the bottom edge of 2nd casing.

Avery Lane Blog: Swim Skirt Sewing tutorial

Avery Lane Blog: Swim Skirt Sewing tutorial

Avery Lane Blog: Swim Skirt Sewing tutorial
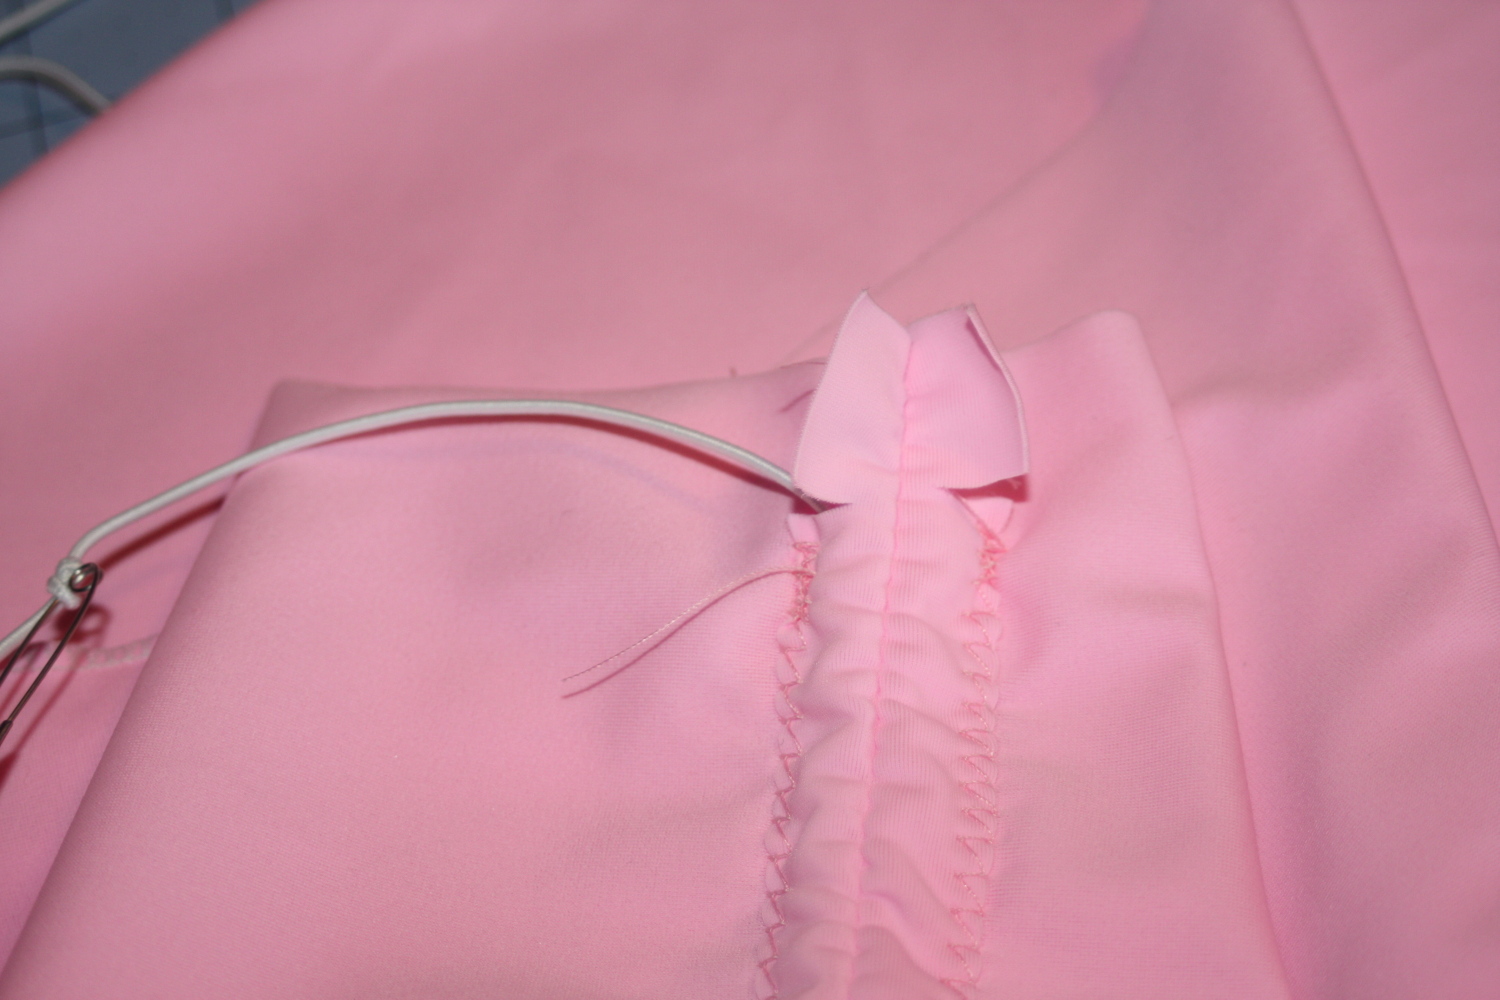
Step 7 Pull both ends toward the right side and pull them up and out of the way. sew across the opening with a zigzag tack to keep the cording to the front.

Avery Lane Blog: Swim Skirt Sewing tutorial

Avery Lane Blog: Swim Skirt Sewing tutorial
Now either add elastic to finish the swim skirt or baste the skirt to bottoms for a skirted bottoms.

Using bottoms and sewing attached bottoms:
If you are sewing a swim skirt with attached bottoms, you’ll need the waist of the skirt to match the waist of the bottoms. To do this, use your swim bottoms pattern. You should draw the top lines the same length as the top lines on your swim bottoms pattern. Then follow steps 2-4 for the rest of the drafting. OR you can add to the waist measurement and stretch the bottoms to fit the skirt when zigzag stitching the skirt to bottoms in preparation to add elastic to the waist.

To sew your swim skirt with attached bottoms:
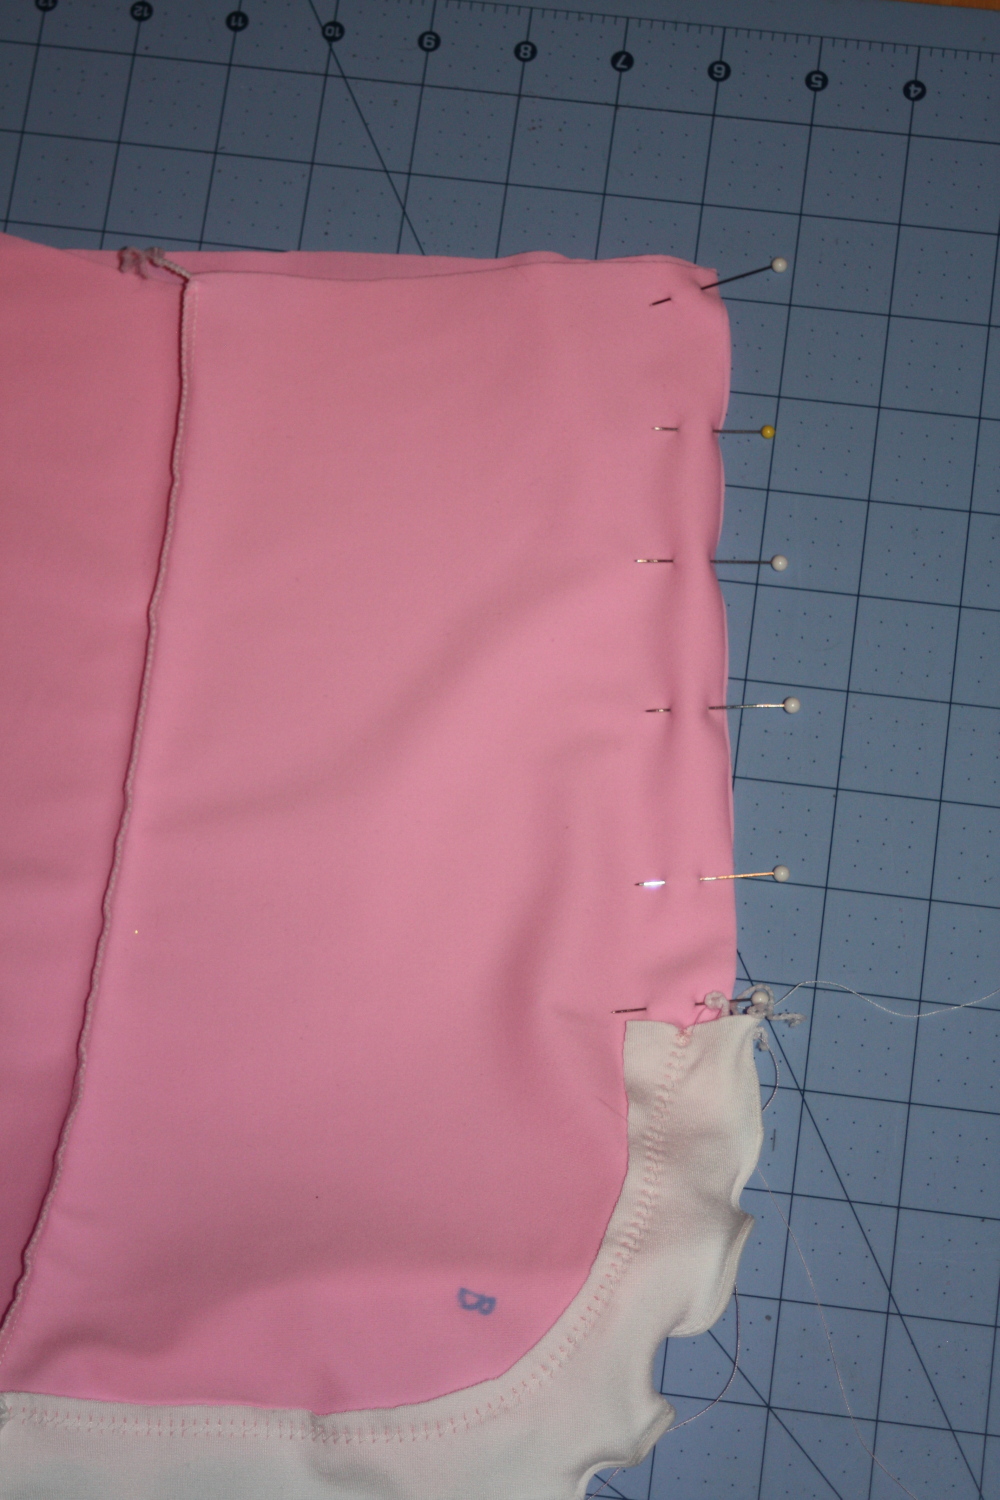
sew both the skirt and the bottoms up until sewing the waist/adding elastic to the waist. Once you’ve sewn all other steps, place the bottoms inside the skirt, so the right side of the bottoms are facing the wrong side of the skirt. Match the side seams together and pin together, keeping raw edges even.

Baste them together with a zigzag stitch.

Add the elastic just as you would for a swim skirt or swim bottoms by themselves, but you will be sewing the elastic to both the skirt and the bottoms at the same time.

Other tips:
Use stretch needles 🙂

For the elastic, cut it about 1-2 inches less than the waist of the skirt. I use 3/8″ wide elastic.

If using a serger, use wooly nylon in loopers and regular serger thread in needle.

3 thread overlock stitch is best and offers the most stretch (if using a serger).

I try to make a trial run first with some less expensive fabric. This way I can see if I need to adjust things, without feeling like I’ve wasted my good fabric. Clearance fabric is great for first attempts.

A very long post with several sewing tutorials (Sorry it’s so long)–I hope it was helpful 🙂
~Erin

How to Draft a Swim Skirt Pattern Sewing Tutorial

Many have asked, “how do you draft a swim skirt pattern?” And so I’ll respond. Consider the following:
A swim skirt is made from stretchy fabric and is therefore more fitted than other skirts (negative ease and a slight A-line)
A swim skirt is shorter than an average skirt–at least the skirts I wear 😉
A swim skirt offers a bit more modesty
Swim skirts are easy to sew and a simple one takes about an hour to sew up on average
Sewing swimsuits and skirts are some of the easiest projects and the fabric makes them so forgiving.

Definitely try sewing one and you’ll see it’s not so complicated as one might think.

In this tutorial, I will explain how to draft a simple swim skirt in 4 easy steps.

Simple Swim Skirt
Step 1:
Avery Lane Blog: how to draft a swim skirt pattern
Measure your waist.

Subtract 3-5″ for negative ease. (For a looser fitting skirt, subtract less. If you want your skirt to fit pretty loose, then just subtract about 1″.) Subtracting 5″ from waist measurement makes for a very tight skirt, which I did not like so much. Update: I’ve made several skirts now, subtracting different amounts for each–It’s ideal to subtract between 1-3 inches from your waist measurement.

Divide that number by 4.

Draw a straight, horizontal line that long.

Step 2:
Avery Lane Blog: how to draft a simple swim skirt
Measure how long you want the skirt to be.
Add 3/4″ at the top for adding elastic
Add 3/8″ for hem allowance at the bottom

Draw a straight line this length perpendicular to the first line you drew. This is the center front/back line and will be placed on the fold in your fabric.

Draw another line perpendicular to the center fold line. You can also use a french curve ruler for this part, to draw your bottom cutting line slightly curved or rounded. I am doing a lettuce edge finish, so I used a straight edge/clear ruler to draw my hem line.

Step 3:
Avery Lane Blog: draft a simple swim skirt
Add 2 inches along the side to make an A-line. Measure 2 inches out along bottom edge.

Step 4:
Avery Lane Blog: how to draft a simple swim skirt tutorial
Use a clear ruler to draw the a-line.

Step 5:
Avery Lane swim skirt drafting tutorial

Use my swim skirt sew along to make this skirt. You can find it here.
Avery Lane Blog DIY swim skirt pattern tutorial

Other tips:

For the elastic, cut it about 1-2 inches less than the waist of the skirt. I use 3/8″ wide elastic.

If using a serger, use wooly nylon in loopers and regular serger thread in needle.

3 thread overlock stitch is best and offers the most stretch (if using a serger).

I try to make a trial run first with some less expensive fabric. This way I can see if I need to adjust things, without feeling like I’ve wasted my good fabric. Clearance fabric is great for first attempts.

UPDATE: I’ve made a couple now, and I prefer the looser fitting style on me ( minus 1″ for negative ease in step 1). My daughter likes a closer fitting skirt (minus 4″ for negative ease in step 1).

~Erin

How to Draft a Swim Skirt Cover Up

Sew a swim skirt in a half hour? When people say, “Oh, that project takes a half hour,” I never believe them. Well, because it usually takes me longer. Maybe if I made several, the time would be shortened. For that reason, I always hesitate to tell people how long the projects should take. It’s so relative to the sewist. Having said that, this project will take so little time it’s ridiculous. –about a half hour, I think. Even drafting the pattern is super quick.

00010Avery Lane Blog: How to Draft a Wrap Style Swim Skirt

This style is also easy fitting. Here’s how you could draft your own pattern if you don’t have one.

Avery Lane Blog: How to Draft a Wrap Style Swim Skirt

Start by drawing a fold line on one end of the paper or tracing paper.
Avery Lane Blog: How to Draft a Wrap Style Swim Skirt

Measure the person’s hip or waist (the place where the top of the wrap skirt will sit). Divide in half and Subtract 1 to 2 inches for negative ease. This is what this skirt has, but I will make this again when my fabric arrives next week and draft it a bit wider to see if it covers more.

Draw the waist cutting line: so my daughter’s waist is 26 and I drew a very slight curved line for 10+ inches. (which is essentially 26/2=13; 13-2=11).

Avery Lane Blog: How to Draft a Wrap Style Swim Skirt

The line then begins to slope up fairly sharply- draw the line upward for another 10 inches or so, using a french curve to draw and measure– though it’s not very curved.

Avery Lane Blog: How to Draft a Wrap Style Swim Skirt

The next line a draw is the tie ends, rounding the end and sloping away gradually from the top slope line of the waist edge.

Avery Lane Blog: How to Draft a Wrap Style Swim Skirt

Before you slope all the way down, mark how long you want the skirt to be and angle the line to meet that length. It should reach that length right below where the top line began its slope upward.

Avery Lane Blog: How to Draft a Wrap Style Swim Skirt

Avery Lane Blog: How to Draft a Wrap Style Swim Skirt

Draw the rest of the bottom edge cutting line, slightly rounded. Again a french curve ruler is your friend here.

Avery Lane Blog: How to Draft a Wrap Style Swim Skirt

Use this pattern to cut out your fabric. Remember to place the fold line on the pattern along the fold of the fabric, and so the greatest amount of stretch will be the width of the skirt.

Avery Lane Blog: How to Draft a Wrap Style Swim Skirt

There are many ways to finish the skirt: rolled hem using the serger and wooly thread in the loopers, a lettuce edge using the serger, twin needle, or a zigzag stitch on a regular sewing machine.

Here’s how I did it. I serged the raw edges.

Avery Lane Blog: How to Draft a Wrap Style Swim Skirt

I folded the edges over toward the wrong side of the fabric and used a zigzag stitch–mainly because it matched the way I finished the matching swimsuit.

Avery Lane Blog: How to Draft a Wrap Style Swim Skirt

Avery Lane Blog: How to Draft a Wrap Style Swim Skirt

The end 😉

Avery Lane Blog: How to Draft a Wrap Style Swim Skirt

She’s liking it very much. I’m thinking I should have made it a bit longer (she chose the length) and perhaps just a tad wider. I hope you enjoy the tutorial and make some fun and easy cover ups to wear out in the sun 🙂
~Erin

How to Serge over Elastic

Good question! I serge over elastic a lot in both my projects and in my tutorials, but I don’t focus all that much on what that looks like. Here’s a tutorial to shoe how I sew elastic onto my projects with a serger.

3 thread overlock or 4:

3 thread overlock. It allows for more stretch.

What needle to use in the serger?

I use stretch needles.

To disengage the knife or not. I do it both ways, depending on the project. When I first started doing this technique, I always disengaged the knife. As I got familiar and more comfortable with the technique, I attempted the trimming as I serge.

It’s good to trim the fabric whenever serging. so when the project is more manageable, like yoga pants, I cut away a slight amount, but am careful to not trim the elastic. You will need to keep the edge of the elastic in a bit from the edge of the fabric.

I disengage when the project is fiddly, difficult to control while serging (like slippery fabric or a small area like a small person’s sleeve). Without the knife cutting away, you can keep the edge of the elastic right along the edge of the fabric.

Use wooly nylon thread in loopers or not.

I use wooly nylon thread in the loopers when I sew: Swimwear, underwear, camis, and compression shorts/shirts. In other words, I usually use wooly nylon when the garment is close fitting and the serger threads will be right against the skin. The wooly nylon makes it more comfortable–it’s super soft and gives the seams a bit more stretch.

I don’t use wooly nylon in the loopers when I sew: cotton lycra clothing, like shirts, shorts, yoga pants, etc. I don’t use it when I sew woven cotton, poplin, seersucker, jersey knit, cotton interlock, or sweatshirt fabric. I never use wooly nylon for loose fitting clothing or clothing that won’t be right against the skin.

UPDATE: Just a reminder, you use regular serger thread in the needle(s). You never use wooly nylon thread for the needles, only in the loopers.

Here are some photos I took for a quick how-to sewing elastic in the round with wooly nylon.
Machine is set up: 3-thread overlock, using a stretch needle. I am sewing in the round, and I have pinned the elastic to the fabric at the quarter points (fourths).

Avery Lane Blog: Serging Elastic sewing tutorial

Begin an inch from the first pin. Place the fabric under the presser foot and angle the fabric toward the presser foot.

Avery Lane Blog: Serging Elastic sewing tutorial

Begin serging and straighten the fabric out as the serger starts sewing the fabric and elastic.

If using the knife to trim the fabric as you sew, then make sure the elastic is a bit off the edge of the fabric:

Avery Lane Blog: Serging Elastic sewing tutorial

Stop and remove the pin. Hold the fabric behind the presser foot and also in front of the presser foot at the next pin, stretching elastic to fit the area. Try to keep the edge of the elastic even with the edge of the fabric (or keep the fabric an even distance from the edge of the elastic if the knife is engaged and you’re trimming as you serge). Sometimes I need to hold in front of the next pin to be able to keep the edges even, especially on curved edges.

Avery Lane Blog: Serging Elastic sewing tutorial

Serge until presser foot reaches the next pin, keeping the elastic stretched, of course.

Avery Lane Blog: Serging Elastic sewing tutorial

Remove the pin and readjust your hold to stretch the elastic to fit the next section.

f

Serge until you reach the beginning point. At which, you will sew past for an inch or sew. Serge off the edge. (please overlook how bad this photo is)

Avery Lane Blog: Serging Elastic sewing tutorial

Trim threads. The wooly nylon threads will be soft on the skin, which is ideal if serging elastic onto underwear or swimsuits.

Avery Lane Blog: Serging Elastic sewing tutorial

I hope this tutorial helps. Let me know if you have any questions that it didn’t answer for you.
~Erin

Classic T-shirt Sleeve Hem

The last method I used for this round of T-shirts is the traditional sleeve style, using a stretch twin needle. This is quick and gives the shirt a non-homemade look. Can you tell that is something we care about around here?

Avery Lane sewing tutorial sewing with twin needle on knits

Using the twin needle (sometimes called double needle) to hem knits is super quick and extremely simple. Here are some helpful tips:

✿ Just make sure you are set up correctly–or it can be very frustrating and expensive, as the needles will break. Check out my extensive photo tutorial for threading your machine with a twin needle here.

✿ Make sure you have a stretch twin needle–it has the blue bar above the needles.

✿ Choose the needle width that is best for your fabric or project. 4,0/75 size for medium or heavy weight knits (also for lined garments), a 2,5/75 stretch twin needle works on light weight knit fabrics to avoid tunneling (see the end of this post for examples).

Do not back stitch. To secure your stitches, sew past the point at which you began sewing–about an inch or two will do.

✿ Set your machine to a straight stitch and a long stitch length. I set my machine at a 4 stitch length for light and medium weight knits and a 4.5-5 stitch length for heavier fabrics. I also set it at a 4.5 or 5 stitch length when I sew over elastic, like when I sew puffy sleeves or swimsuits.

✿ When hemming with the twin needle:

✿ Press the hem first. Use an EZY-Hem or sewing gauge to keep it accurate.

✿ Sew the hem with the right side of the fabric facing up (I begin sewing along the back, so the overlapped stitching is in the back of my project).

✿ Sew with the left needle directly on the raw edge (you won’t be able to see this raw edge, but can feel it as you guide your fabric). The closer you are to enclosing the raw edge within the zigzag stitch on the wrong side of your project, the less rolling and flipping your finished hem will do. This takes practice. I like to fold and press 3/8″ for my hems, and line up the fold in the fabric along the 3/8″ seam allowance guide line on my machine.

✿ After sewing the hem, trim any extra fabric (raw edge) close to the stitching on the inside of your project.

I used this method on the sleeves of a couple of the t-shirts I recently sewed. I also hemmed all the shirts with this method. A nice, fast way to finish and looks good, too.

Avery Lane Blog sewing tutorials

Here’s a look at what I’ve got on the chopping block. My daughter also prefers the way handmade feels and looks, so this one is for her. What’s on your cutting table?

avery lane blog sewing tutorials

Happy Sewing!
~Erin

Ringer Tee Sewing Tutorial

A seventies style at its finest, the ringer tee is easy to make from any t-shirt pattern. I’ve done this technique for myself and my kids, using Jalie, KwikSew, and Ottobre. The example tee is an Ottobre pattern from 2/2007.

Avery Lane Blog

You can see how I sew the neckline binding here. Sew the sleeve and side seams. For the sleeves, I use pretty much the same technique.

1. Cut a strip of ribbing (I sometimes use cotton lycra instead of ribbing). I cut mine1 3/8″ wide. Make sure the binding is straight on the grain–if it’s not, then it will not work as well; it may twist and get all wonky. The length should be the arm circumference plus 1 to 2″.

Avery Lane Blog
2. Fold and press the binding in half lengthwise. Unfold and sew the ends together to form loops.

3. Press seam allowances open and re-press the lengthwise folds.
Avery Lane Blog

4. Divide the bindings into 4 equal parts and mark with pins or with a fabric marker. Divide and mark the sleeve into 4 equal parts (quarters).
Avery Lane Blog

5. Pin the binding to the sleeves at these quarter points, right sides together. The binding should be slightly smaller in circumference than the sleeve.
Avery Lane Blog

6. Sew together with a 3/8″ seam allowance, keeping the raw edges together and stretching the binding to fit each section. Remember to remove pins when they approach the presser foot, and be careful to only stretch the binding, not the sleeve fabric.
Avery Lane Blog

7. Serge the seam allowances.
Avery Lane Blog

8. With an iron, press the seam allowances toward the sleeve. Use a stretch twin needle to top stitch the binding and sleeve. While the twin needle is still set up, hem the shirt.
Avery Lane Blog

Avery Lane Blog--ringer tee sewing tutorial
Your sweet ringer tee is done. The stretch twin needle is a great way to give your knits a polished look. It’s easy to use, too. For more help setting up your machine for sewing with a twin needle, look at this post. If the machine is not threaded properly, you may end up with a lot of broken threads and/or needles.

Enjoy!
~Erin

Sewing a T-shirt or Two

Yes, I sew my own t-shirts. Sewing T-shirts is actually one of the fastest projects I regularly do. It’s no secret around here that I live in t-shirts and jeans (and shorts during our few warm months).
Recently, I lamented that I have too much sewing to do before we leave for our family vacation in July. My adorable husband says: “why not buy some of what you need? go shopping.” I would, but my favorite shirts, the shirts I wear most often, are the ones I make myself. There’s several reasons for this–
I can make the styles I like, in the colors/fabric that I like, and
I can make sure it fits me, instead of settling for the average small, medium, or large woman sizing
I know they won’t shrink funky, wonky, or otherwise misshapen.

T-shirts are super easy to make. The neckline is the trickiest part, but once you’ve done it a couple of times–it’s not so tricky. (make sure you use stretch needles in both traditional machine and serger, and a stretch twin needle)

Like many people, I don’t want to wear the same shirt in a few different colors day after day–I want each shirt to look unique. I feel a teeny bit more stylish that way. (okay, I know. T-shirts everyday can hardly be considered uber stylish, but whatever.) Changing up the neckline can help to give each shirt its own style and personality.

Avery Lane Blog

These shirts are made from an Ottobre pattern, issue 2/2007, which has several neckline and sleeve variations to mix and match. I love these T-shirts. The fit is awesome. I don’t follow Ottobre’s instructions for binding the neckline. I always sew my neckline bindings in the round. And I like to switch it up. I usually do different necklines based on the fabric I’m using. So first I sew all the shoulder seams. Then sew each neckline up until its final top stitching step. That way I can set up my machine with a twin needle and finish all necklines at the same time. Saves a little time 🙂

The pink with white binding is a cotton lycra, and I did a traditional t-shirt binding. I think Threads Magazine has the best tutorial on how to do a neckline binding like this in the round. There’s no point to doing another tutorial when this one is pretty much all you need. After sewing the binding on, make sure you press the neckline really well.

Avery Lane Blog

When the fabric is a lighter weight jersey, like this blue floral, I like to do a self-binding type neckline. It’s super easy, somewhat easier than the traditional T-shirt binding. I also do this in the round, usually using the measurement provided by the pattern. If the pattern does not offer the measurement, then I use the Threads magazine method for determining the length of the binding. After sewing the binding into a loop, I quarter both the neck opening and binding (also shown in the Threads method), pin right sides together and sew the binding to neck opening with my traditional sewing machine. I then serge the seam.

Press the binding to the inside, wrapping it around the seam allowance. I pin it in place to help it stay neat and uniform all the way around. (just be sure to remove the pins as you top stitch–do not sew over pins. Well, unless you wear safety goggles, and don’t mind getting your machine repaired 😉 )

Avery Lane Blog

The white shirt uses the technique Ottobre included for one of the neckline versions in that issue. (Though I did it in the round, not in the flat as they instructed)

1. Cut some poplin on the bias. I cut my bias strip and trimmed it to about 3/8″ wide
Avery Lane Blog

2. Press and curve the bias strip, to make it follow the neckline more easily. Pin the wrong side of the bias strip to the right side of the neckline. Baste it in place. Since I am sewing it in the round, I overlapped the binding strip an inch or so in the back.
Avery Lane Blog

All these will get top stitched with a twin needle, so I usually save this step to do all the shirts at once.

For the traditional binding: One stitching line is on the shirt, and the other row of stitching is on the binding.
Avery Lane Blog

For the fold and sew method: Both stitching lines are on the binding. Instead of pins, you could use wonder tape. It washes out and keeps things pretty much where you want them to stay when sewing. It does get a bit expensive, so I use pins and remove them as I sew (do not sew over pins). After sewing the binding with the stretch twin needle, trim any extra fabric on the inside, being careful not to cut your stitches.
Avery Lane Blog

Click on this photo for a close up:
Avery Lane Blog t-shirt neckline tutorials

The white with floral poplin binding is top stitched down the middle of the poplin bias strip with the twin needle, and left to fray. I usually like things more finished looking, but I like the idea of it. So I gave it a go.

Avery Lane Blog

Avery Lane Blog sewing tutorials

Update: this is what the fraying effect looks like (click on the photo for a close up view):

Avery Lane Blog sewing t-shirt neckline tutorials

Now all the shirts have a neckline, giving each its own look, I’ll continue with the sleeves, side seams, and hems (both on the sleeves and bottom edges). The sleeves are another way to individualize each shirt, so no one knows I’m basically using the same pattern for all these shirts.

What are your go-to t-shirt patterns? I would love to add some to my sick hoarding pattern obsession lovely pattern stash.
~Erin

Pressing Hems and Casings: DIY Ez-Hem pressing guide

I love my EZ-Hem–did you know it used to be spelled EZY-Hem? And that credit was given to Edna Bryte Bishop? And that it used to cost only $1.25? Fun facts I found out when I chanced upon this great find at my local thrift shop:
vintage Ezy-Hem Avery Lane Blog

As stated, I do love my Ez-Hem, but find it is not a good tool for kids to use. It gets hot while in use and they can’t hold it without possibly burning their finger tips. When I’m teaching kids sewing classes, I like to bring my handmade pressing guides. These are much easier for the kids to use (no more burned finger tips).
EZ-Hem

They are super easy to make. I use file folders, but any card stock will work well. Make sure its edge is straight. Cut with a rotary cutter and straight edge if needed.
pressing guide diy

Use a clear straight edge to mark folding lines.
HandMade EZ-hem

make  pressing guides

In the class I will be teaching, the kids will need to press the casing 3/4 inch, which the EZ-Hem doesn’t have this measurement marked anyway. So I made one specifically for the class I am teaching:
hand made pressing guide

To use the pressing guide, place the card stock on the wrong side of the fabric, fold over the fabric to the pressing line needed, and press it with the iron.

**Make sure you supervise kids while they are using the iron. I have never had the card stock start to brown or burn, but it’s important to be cautious.**

how to use pressing guide to press hems or casings

how to use pressing guide to press hems or casings

Enjoy!
~Erin

DIY Spaghetti Straps

One of the handiest thingies in my sewing box is the bias tape maker. Nope, not the electronic machine thing. Just a simple gadget that keeps you from burning your fingers while pressing the small piece of fabric. I use this for making tiny straps for summer dresses and tops. Since we saw about 25 Robins this morning on our walk to school (I kid you not–there were too many to count. I don’t think I’ve ever seen that many Robins in one place before), it means spring is coming soon-yay! Which means spring and summer sewing at our house. My girls love to plan warm weather clothes, and I love to sew them up. So spaghetti straps are in order, as they are a favorite request.

I don’t always cut them on the bias (diagonally across the grain of the woven fabric), and have not had problems.

You’ll need to cut your fabric strips the width specified for the size bias tape maker you’re using.

cut  a narrow  strip of fabric

First, snip diagonally at the end of your fabric strip. snip ends

Put the trimmed end in the bias tape maker. Use a straight pin to push it through. Use the pin to slide it until it comes out the narrow end.

put the trimmed end in the bias tape maker

Then use an iron to press the folded fabric that is now sticking out of the narrow part of the bias tape maker. At this point, you can hold the handle thing on top of the bias tape maker and pull it away from the iron and folded fabric. Pull just a little at a time and iron the fabric that comes out.

pull and iron

Pull a little, iron a little, and repeat—until you’ve ironed the whole strip.

ta-da!

Now fold it in half lengthwise for a double fold bias tape and press.

fold in half and press

Now sew  it closed.

sew

And it’s done!

all done

Quick and easy, without getting your hands near that hot iron.

Happy Spring!

~Erin

A Doll Quilt

I have a confession: I am the only sewist in my family who has never sewn a quilt. I have sewn 2 twin sized quilt tops, but I have been extremely intimidated by the rest of the project. Plus I like things to be perfectly lined up and such. As far as I can tell, no quilt has perfect points in all its piecework–mine certainly did not. This bothers me. Many people tell me that is how it is.  Buying the batting and backing was as far as I’ve ever gotten toward finishing the tops into actual quilts. So there they sat, until they were donated to local sewing for charity groups. I love quilts and so I decided to start small. A sweet doll quilt for my daughter’s doll.

I am not going to pretend to know a lot about quilting. Just thought this design was quite cute and fast, so I thought it would be  nice to share. While browsing the internet for rag quilt inspiration (the only kind of quilt I was comfortable with), I came across a quilt on the Riley Blake blog. It called itself a disappearing  9 square, which uses a nine square. Well, I’d never even heard of a nine square, so I googled to find out more. I liked what I saw and decided to give it a whirl. It’s just a doll quilt after all. How much harm can it do me?

Here’s how I did it. Going against the advice given on several sites, I used 3 fabrics, not nine. Though I think 9 different prints looks great, I knew I wasn’t ready for that. I could see the quilt never getting done, because I would most likely pull out most of my stash and contemplate for hours which nine fabrics to choose.

To start, I cut 4  5 inch squares of two of the prints, and only one 5 inch square of the third print. Sewed them together into a 9 square block. Repeated for a second 9 square block.

9 square quilting block

Ironed all my seam allowances and then cut the block into four equal parts.

cut in half

in half again

Then rearranged them. It can be done randomly, which my daughter is trying to teach me to be okay with. I’m definitely not there. Here are some of the possibilities for placement.

one way

or another

I chose and sewed them together.

Added borders. I needed 2 pieces 20 inches long for the sides I made them 2 1/4 inches wide. For bottom and top I needed 17 inches wide, and again made them 2 1/4 inches wide.

contrasting border

For the backing I needed 23 1/4 inches by 17 inches.

Here it is: my first real quilt. Real small, first quilt.

disappearing nine square for doll

I used some pre-made bias tape for the binding, which I would have preferred a solid color. I just didn’t have enough of the color I liked best on hand and I needed to finish. It’s also nice to not always need to spend money to finish a project. This one was done completely from my stash. To hand stitch the binding to the backside, I used this really cool hand sewing stitch called an Invisible Ladder stitch–seemed fitting for a Disappearing nine Square quilt. A fellow sewing mama shared this link with me for a how to.

I also found an extremely helpful video tutorial, on Jay Bird  Quilts, which covered everything.  Really the only video/tutorial one would need–wish I had stumbled upon it before I started the quilt.

For the quilting, I think I got too bold. I wish I had just done straight stitching, such as stitching in the ditch. I had such grand intentions of making the back pretty, but soon realized I did not really know what I was doing, lol. Too late and too many stitches to pick out to switch mid way, so it is what it is 🙂

I had 2 squares from the 2nd nine square block left over, so I sewed them together, stuffed them, and created a throw pillow to match.

matching pillow

All in all this is a pretty quick project, especially if you’ve made quilts before and know what you’re doing. But it’s also very attainable for a novice, such as myself.

~Erin